机器学习编排
通过创建可扩展的管道来创建、安排和监控工作流。
Intuition
到目前为止,已经将 DataOps(ELT、验证等)和 MLOps(优化、训练、评估等)工作流实现为 Python 函数调用。这很有效,因为数据集是静态的并且很小。但是当需要:
- 在新数据到来时安排这些工作流程?
- 随着数据的增长扩展这些工作流程?
- 将这些工作流程共享给下游应用程序?
- 监控这些工作流程?
需要将端到端 ML 管道分解为可以根据需要进行编排的各个工作流程。有几种工具可以帮助,例如Airflow、Prefect、Dagster、Luigi、Orchest,甚至一些以 ML 为重点的选项,例如Metaflow、Flyte、KubeFlow Pipelines、Vertex pipelines等。将使用 AirFlow 创建工作流程对于它:
- 业界广泛采用开源平台
- 基于 Python 的软件开发工具包 (SDK)
- 本地运行和轻松扩展的能力
- 多年来的成熟度和 apache 生态系统的一部分
将在本地运行 Airflow,但可以通过在托管集群平台上运行来轻松扩展它,在该平台上,可以在大型批处理作业(AWS EMR、Google Cloud 的Dataproc、本地硬件、 ETC。)。
Airflow
在创建特定管道之前,让了解和实施Airflow的总体概念,这些概念将使能够“创作、安排和监控工作流程”。
单独的存储库
在本课中的工作将存在于一个单独的存储库中,因此创建一个
mlops-course名为data-engineering. 本课的所有工作都可以在 数据工程repository。
设置
要安装和运行 Airflow,可以在本地或使用Docker进行。如果docker-compose用于在 Docker 容器中运行 Airflow,需要分配至少 4 GB 的内存。
# Configurations
export AIRFLOW_HOME=${PWD}/airflow
AIRFLOW_VERSION=2.3.3
PYTHON_VERSION="$(python --version | cut -d " " -f 2 | cut -d "." -f 1-2)"
CONSTRAINT_URL="https://raw.githubusercontent.com/apache/airflow/constraints-${AIRFLOW_VERSION}/constraints-${PYTHON_VERSION}.txt"

# Install Airflow (may need to upgrade pip)
pip install "apache-airflow==${AIRFLOW_VERSION}" --constraint "${CONSTRAINT_URL}"

# Initialize DB (SQLite by default)
airflow db init
这将创建一个airflow包含以下组件的目录:
airflow/
├── logs/
├── airflow.cfg
├── airflow.db
├── unittests.cfg
└── webserver_config.py
将编辑airflow.cfg文件以最适合需求:
# Inside airflow.cfg
enable_xcom_pickling = True  # needed for Great Expectations airflow provider
load_examples = False  # don't clutter webserver with examples
将执行重置以实现这些配置更改。
现在已经准备好使用管理员用户来初始化数据库,将使用它来登录以访问在网络服务器中的工作流。
# We'll be prompted to enter a password
airflow users create \
    --username admin \
    --firstname FIRSTNAME \
    --lastname LASTNAME \
    --role Admin \
    --email EMAIL
网络服务器
创建用户后,就可以启动网络服务器并使用凭据登录了。
# Launch webserver
source venv/bin/activate
export AIRFLOW_HOME=${PWD}/airflow
airflow webserver --port 8080  # http://localhost:8080
网络服务器允许通过 UI 运行和检查工作流程,建立与外部数据存储、管理用户等的连接。同样,也可以使用 Airflow 的REST API或命令行界面 (CLI)来执行相同的操作。但是,将使用网络服务器,因为它可以方便地直观地检查工作流程。
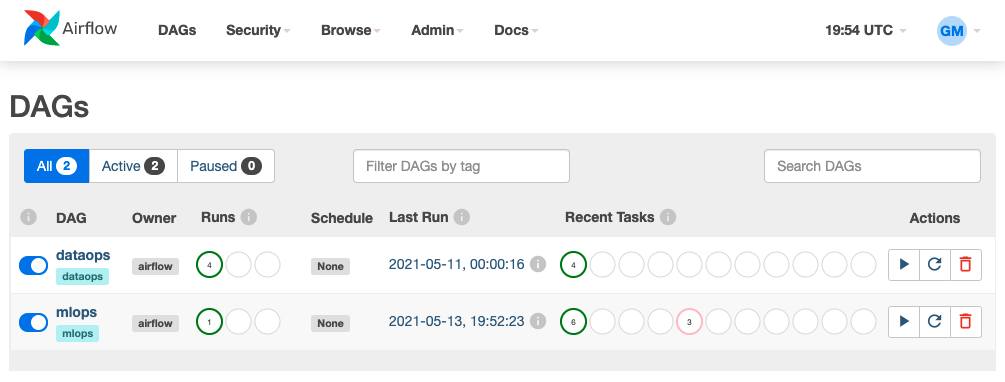
在了解 Airflow 并实施工作流程时,将探索网络服务器的不同组件。
调度器
接下来,需要启动调度程序,它将执行和监控工作流程中的任务。该计划通过从元数据数据库中读取来执行任务,并确保任务具有完成运行所需的内容。将继续在_单独的终端_窗口上执行以下命令:
# Launch scheduler (in separate terminal)
source venv/bin/activate
export AIRFLOW_HOME=${PWD}/airflow
export OBJC_DISABLE_INITIALIZE_FORK_SAFETY=YES
airflow scheduler
执行者
当调度程序从元数据数据库中读取数据时,执行程序会确定任务运行完成所需的工作进程。由于默认数据库 SQLlite 不支持多个连接,因此默认执行器是Sequential Executor。但是,如果选择生产级的数据库选项,例如 PostgresSQL 或 MySQL,可以选择可扩展的Executor 后端Celery、Kubernetes 等。例如,使用 Docker 运行 Airflow使用 PostgresSQL 作为数据库,因此使用 Celery Executor 后端并行运行任务。
有向无环图
工作流由有向无环图(DAG)定义,其节点代表任务,边代表任务之间的数据流关系。直接和非循环意味着工作流只能在一个方向上执行,并且一旦下游任务开始,之前的上游任务就不能再次运行。
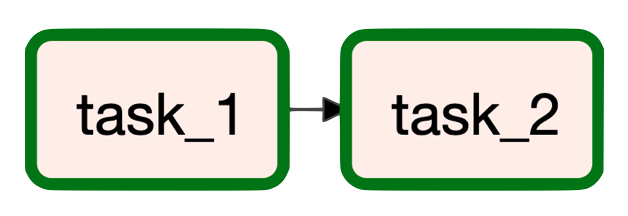
DAG 可以在目录内的 Python 工作流脚本中定义airflow/dags,它们会自动出现(并不断更新)在网络服务器上。在开始创建 DataOps 和 MLOps 工作流之前,将通过气流/dags/example.py中概述的示例 DAG 了解 Airflow 的概念。在新的(第三个)终端窗口中执行以下命令:
mkdir airflow/dags
touch airflow/dags/example.py
在每个工作流脚本中,可以定义一些默认参数,这些参数将应用于该工作流中的所有 DAG。
# Default DAG args
default_args = {
    "owner": "airflow",
}
通常, DAG 并不是 Airflow 集群中唯一运行的 DAG。但是,当需要不同的资源、包版本等时,执行不同的工作流可能会很混乱,有时甚至是不可能的。对于拥有多个项目的团队来说,使用 KubernetesPodOperator 之类的东西使用隔离的docker 映像来执行每个作业是个好主意。
可以使用许多参数(将覆盖 中的相同参数default_args)和几种不同的方式初始化 DAG:
-
使用with 语句
from airflow import DAG with DAG( dag_id="example", description="Example DAG", default_args=default_args, schedule_interval=None, start_date=days_ago(2), tags=["example"], ) as example: # Define tasks pass -
使用dag 装饰器
from airflow.decorators import dag

@dag(
    dag_id="example",
    description="Example DAG",
    default_args=default_args,
    schedule_interval=None,
    start_date=days_ago(2),
    tags=["example"],
)
def example():
    # Define tasks
    pass
可以使用许多参数来初始化 DAG,包括 a
start_date和 aschedule_interval。虽然可以让工作流按时间节奏执行,但许多 ML 工作流是由事件启动的,可以使用传感器和hook将其映射到外部数据库、文件系统等。
任务
任务是在工作流中执行的操作,由 DAG 中的节点表示。每个任务应该是一个明确定义的单个操作,并且应该是幂等的,这意味着可以多次执行它并期望相同的结果和系统状态。如果需要重试失败的任务并且不必担心重置系统状态,这很重要。与 DAG 一样,有几种不同的方式来实现任务:
-
使用任务装饰器
from airflow.decorators import dag, task from airflow.utils.dates import days_ago @dag( dag_id="example", description="Example DAG with task decorators", default_args=default_args, schedule_interval=None, start_date=days_ago(2), tags=["example"], ) def example(): @task def task_1(): return 1 @task def task_2(x): return x+1 -
使用运算符
from airflow.decorators import dag
from airflow.operators.bash_operator import BashOperator
from airflow.utils.dates import days_ago

@dag(
    dag_id="example",
    description="Example DAG with Operators",
    default_args=default_args,
    schedule_interval=None,
    start_date=days_ago(2),
    tags=["example"],
)
def example():
    # Define tasks
    task_1 = BashOperator(task_id="task_1", bash_command="echo 1")
    task_2 = BashOperator(task_id="task_2", bash_command="echo 2")
虽然图是有向的,但可以为每个任务建立一定的触发规则,以在父任务的条件成功或失败时执行。
Operators
第一种创建任务的方法涉及使用操作符,它定义了任务将要做什么。Airflow 有很多内置的 Operator,例如BashOperator或PythonOperator,它们可以让分别执行 bash 和 Python 命令。
# BashOperator
from airflow.operators.bash_operator import BashOperator
task_1 = BashOperator(task_id="task_1", bash_command="echo 1")

# PythonOperator
from airflow.operators.python import PythonOperator
task_2 = PythonOperator(
    task_id="task_2",
    python_callable=foo,
    op_kwargs={"arg1": ...})
还有许多其他 Airflow 原生Operator(电子邮件、S3、MySQL、Hive 等),以及社区维护的提供程序包(Kubernetes、Snowflake、Azure、AWS、Salesforce、Tableau 等),用于执行特定于某些平台或工具。
还可以通过扩展BashOperator类来创建自己的自定义运算符
关系
一旦使用运算符或修饰函数定义了任务,需要定义它们之间的关系(边)。定义关系的方式取决于任务是如何定义的:
-
使用装饰函数
# Task relationships x = task_1() y = task_2(x=x) -
使用运算符
# Task relationships
task_1 >> task_2  # same as task_1.set_downstream(task_2) or
                  # task_2.set_upstream(task_1)
在这两种情况下,都将task_2下游任务设置为task_1.
note
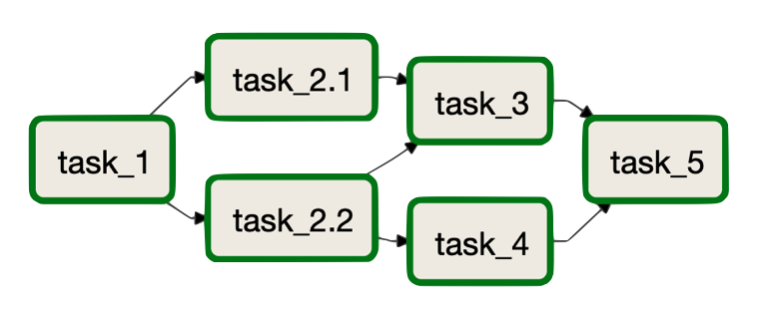
甚至可以通过使用这些符号来定义关系来创建复杂的 DAG。
task_1 >> [task_2_1, task_2_2] >> task_3
task_2_2 >> task_4
[task_3, task_4] >> task_5
XComs
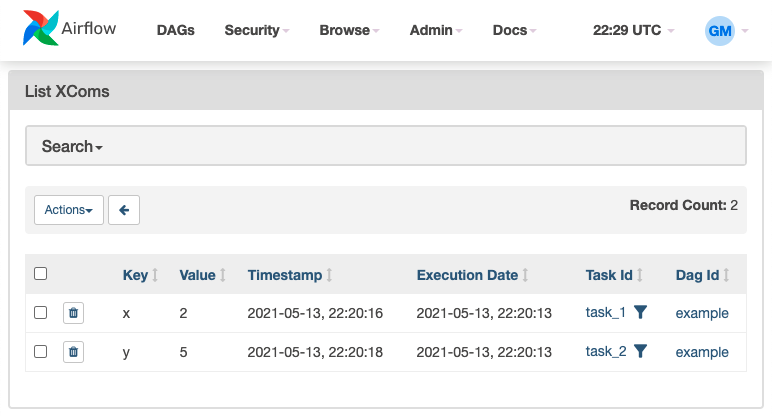
当使用任务装饰器时,可以看到值是如何在任务之间传递的。但是,如何在使用运算符时传递值?Airflow 使用 XComs(交叉通信)对象,通过键、值、时间戳和 task_id 定义,在任务之间推送和拉取值。当使用修饰函数时,XComs 是在底层使用的,但它被抽象掉了,允许在 Python 函数之间无缝地传递值。但是在使用运算符时,需要根据需要显式地推送和拉取值。
def _task_1(ti):
    x = 2
    ti.xcom_push(key="x", value=x)

def _task_2(ti):
    x = ti.xcom_pull(key="x", task_ids=["task_1"])[0]
    y = x + 3
    ti.xcom_push(key="y", value=y)

@dag(
    dag_id="example",
    description="Example DAG",
    default_args=default_args,
    schedule_interval=None,
    start_date=days_ago(2),
    tags=["example"],
)
def example2():
    # Tasks
    task_1 = PythonOperator(task_id="task_1", python_callable=_task_1)
    task_2 = PythonOperator(task_id="task_2", python_callable=_task_2)
    task_1 >> task_2
还可以通过转到Admin » XComs 在网络服务器上查看 XCom:
warning
在任务之间传递的数据应该很小(元数据、指标等),因为 Airflow 的元数据数据库无法容纳大型工件。但是,如果确实需要存储和使用任务的大量结果,最好使用外部数据存储(博客存储、模型注册表等)并使用 Spark 或内部数据系统(如数据仓库)执行繁重的处理。
DAG 运行
一旦定义了任务及其关系,就可以运行 DAG。将开始像这样定义 DAG:
# Run DAGs
example1_dag = example_1()
example2_dag = example_2()
当刷新Airflow 网络服务器时,新的 DAG 就会出现。
手动的
DAG 最初是暂停的,因为dags_are_paused_at_creation = True在airflow.cfg配置中指定,所以必须通过单击它 > 取消暂停它(切换)> 触发它(按钮)来手动执行这个 DAG。要查看 DAG 运行中任何任务的日志,可以单击任务 > 日志。

note
还可以使用 Airflow 的REST API(将配置授权)或命令行界面 (CLI)来检查和触发工作流(以及更多)。或者甚至可以使用
trigger_dagrunOperator 从另一个工作流程中触发 DAG。# CLI to run dags airflow dags trigger <DAG_ID>
间隔
如果在定义 DAG 时指定了一个start_dateand schedule_interval,它将在适当的时间自动执行。例如,下面的 DAG 将在两天前开始,并将在每天开始时触发。
from airflow.decorators import dag
from airflow.utils.dates import days_ago
from datetime import timedelta

@dag(
    dag_id="example",
    default_args=default_args,
    schedule_interval=timedelta(days=1),
    start_date=days_ago(2),
    tags=["example"],
    catch_up=False,
)
warning
根据
start_dateandschedule_interval,工作流程应该已经被触发了几次,Airflow 将尝试赶上当前时间。catchup=False可以通过在定义 DAG 时进行设置来避免这种情况。还可以将此配置设置为默认参数的一部分:default_args = { "owner": "airflow", "catch_up": False, }但是,如果确实想在过去运行特定的运行,可以手动回填需要的内容。
还可以为参数指定一个cron表达式,schedule_interval甚至可以使用cron 预设。
Airflow 的调度程序
schedule_interval将从start_date. 例如,如果希望工作流开始01-01-1983并运行@daily,那么第一次运行将立即在01-01-1983T11:59.
传感器
虽然在计划的时间间隔内执行许多数据处理工作流可能是有意义的,但机器学习工作流可能需要更细微的触发器。不应该通过运行工作流来浪费计算,_以防万一_有新数据。相反,可以使用传感器在满足某些外部条件时触发工作流。例如,当数据库中出现新一批带注释的数据或文件系统中出现特定文件时,可以启动数据处理等。
Airflow 还有很多其他功能(监控、任务组、智能传感器等),因此请务必在需要时使用官方文档进行探索。
数据运维
现在已经回顾了 Airflow 的主要概念,已经准备好创建 DataOps 工作流了。这与在数据堆栈课程中定义的工作流程完全相同——提取、加载和转换——但这次将以编程方式完成所有工作并使用 Airflow 进行编排。
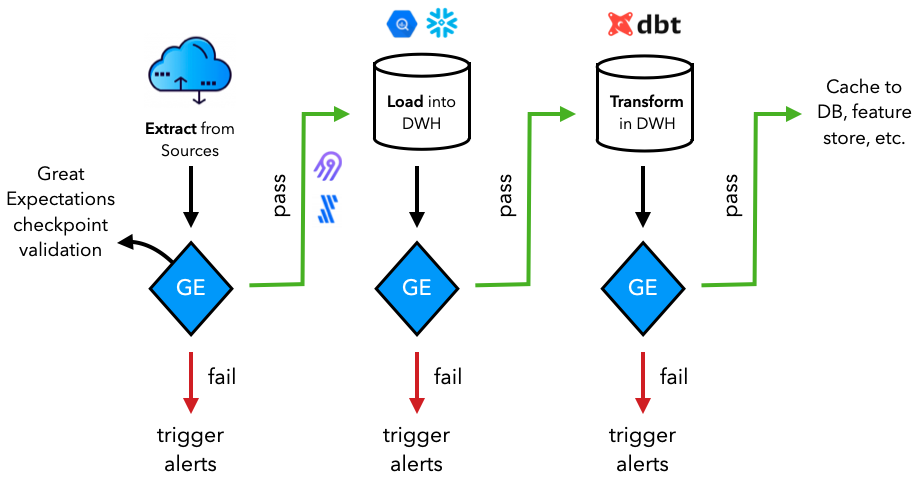
将从创建定义工作流程的脚本开始:
touch airflow/dags/workflows.py
from pathlib import Path
from airflow.decorators import dag
from airflow.utils.dates import days_ago
# Default DAG args
default_args = {
    "owner": "airflow",
    "catch_up": False,
}
BASE_DIR = Path(__file__).parent.parent.parent.absolute()
@dag(
dag_id="dataops",
description="DataOps workflows.",
default_args=default_args,
schedule_interval=None,
start_date=days_ago(2),
tags=["dataops"],
)
def dataops():
"""DataOps workflows."""
pass
# Run DAG
do = dataops()
在两个单独的终端中,激活虚拟环境并启动 Airflow 网络服务器和调度程序:
# Airflow webserver

source venv/bin/activate
export AIRFLOW_HOME=${PWD}/airflow
export GOOGLE_APPLICATION_CREDENTIALS=/Users/goku/Downloads/made-with-ml-XXXXXX-XXXXXXXXXXXX.json # REPLACE
airflow webserver --port 8080

# Go to http://localhost:8080
# Airflow scheduler

source venv/bin/activate
export AIRFLOW_HOME=${PWD}/airflow
export OBJC_DISABLE_INITIALIZE_FORK_SAFETY=YES
export GOOGLE_APPLICATION_CREDENTIALS=~/Downloads/made-with-ml-XXXXXX-XXXXXXXXXXXX.json # REPLACE
airflow scheduler
提取和加载
将使用在数据堆栈课程中设置的 Airbyte 连接,但这次将以编程方式触发与 Airflow 的数据同步。首先,让确保 Airbyte 在其存储库中的单独终端上运行:
git clone https://github.com/airbytehq/airbyte.git  # skip if already create in data-stack lesson
cd airbyte
docker-compose up
接下来,让安装所需的包并建立 Airbyte 和 Airflow 之间的连接:
pip install apache-airflow-providers-airbyte==3.1.0
-
转到Airflow 网络服务器并单击
Admin>Connections> ➕ -
添加具有以下详细信息的连接:
Connection ID: airbyte
Connection Type: HTTP
Host: localhost
Port: 8000
也可以通过编程方式建立连接,但最好使用 UI 来了解引擎盖下发生的事情。
为了执行transformers提取和加载数据同步,可以使用AirbyteTriggerSyncOperator:
@dag(...)
def dataops():
    """Production DataOps workflows."""
    # Extract + Load
    extract_and_load_projects = AirbyteTriggerSyncOperator(
        task_id="extract_and_load_projects",
        airbyte_conn_id="airbyte",
        connection_id="XXXXXXXX-XXXX-XXXX-XXXX-XXXXXXXXXXXX",  # REPLACE
        asynchronous=False,
        timeout=3600,
        wait_seconds=3,
    )
    extract_and_load_tags = AirbyteTriggerSyncOperator(
        task_id="extract_and_load_tags",
        airbyte_conn_id="airbyte",
        connection_id="XXXXXXXX-XXXX-XXXX-XXXX-XXXXXXXXXXXX",  # REPLACE
        asynchronous=False,
        timeout=3600,
        wait_seconds=3,
    )

    # Define DAG
    extract_and_load_projects
    extract_and_load_tags
可以通过以下方式找到connection_id每个 Airbyte 连接:
-
转到transformersAirbyte 网络服务器并单击
Connections左侧菜单。 -
单击要使用的特定连接,URL 应如下所示:
https://demo.airbyte.io/workspaces/<WORKSPACE_ID>/connections/<CONNECTION_ID>/status -
位置中的字符串
CONNECTION_ID是连接的 ID。
现在可以触发transformers DAG 并查看提取的数据加载到transformers BigQuery 数据仓库中,但是一旦定义了整个 DataOps 工作流,将继续开发和执行transformers DAG。
证实
可以定制提取数据的位置和方式的具体过程,但重要的是在每个步骤中都进行了验证。正如在测试课程中所做的那样,将再次使用Great Expectations在转换数据之前验证提取和加载的数据。
通过目前学习的 Airflow 概念,可以通过多种方式使用transformers数据验证库来验证transformers数据。无论使用什么数据验证工具(例如Great Expectations、TFX、AWS Deequ等),都可以使用 BashOperator、PythonOperator 等来运行transformers测试。但是,Great Expectations 有一个Airflow Provider 包,可以更轻松地验证transformers数据。这个包包含一个GreatExpectationsOperator可以用来将特定检查点作为任务执行的。
pip install airflow-provider-great-expectations==0.1.1 great-expectations==0.15.19
great_expectations init
这将在transformers数据工程存储库中创建以下目录:
tests/great_expectations/
├── checkpoints/
├── expectations/
├── plugins/
├── uncommitted/
├── .gitignore
└── great_expectations.yml
数据源
但首先,在创建测试之前,需要datasource在 Great Expectations 中为transformers Google BigQuery 数据仓库定义一个新的。这将需要几个包和出口:
pip install pybigquery==0.10.2 sqlalchemy_bigquery==1.4.4
export GOOGLE_APPLICATION_CREDENTIALS=/Users/goku/Downloads/made-with-ml-XXXXXX-XXXXXXXXXXXX.json  # REPLACE
great_expectations datasource new
What data would you like Great Expectations to connect to?
    1. Files on a filesystem (for processing with Pandas or Spark)
    2. Relational database (SQL) 👈
What are you processing your files with?
1. MySQL
2. Postgres
3. Redshift
4. Snowflake
5. BigQuery 👈
6. other - Do you have a working SQLAlchemy connection string?
这将打开一个交互式note,可以在其中填写以下详细信息:
datasource_name = “dwh"
connection_string = “bigquery://made-with-ml-359923/mlops_course”
Suite
接下来,可以为transformers数据assert创建一套期望:
great_expectations suite new
How would you like to create your Expectation Suite?
    1. Manually, without interacting with a sample batch of data (default)
    2. Interactively, with a sample batch of data 👈
    3. Automatically, using a profiler
Select a datasource
    1. dwh 👈
Which data asset (accessible by data connector "default_inferred_data_connector_name") would you like to use?
    1. mlops_course.projects 👈
    2. mlops_course.tags
Name the new Expectation Suite [mlops.projects.warning]: projects
这将打开一个交互式note,可以在其中定义transformers期望。为transformers标签数据assert创建suite也重复相同的操作。
Expectations for
mlops_course.projectsTable expectations
# data leak
validator.expect_compound_columns_to_be_unique(column_list=["title", "description"])
Column expectations:
# id
validator.expect_column_values_to_be_unique(column="id")

# create_on
validator.expect_column_values_to_not_be_null(column="created_on")

# title
validator.expect_column_values_to_not_be_null(column="title")
validator.expect_column_values_to_be_of_type(column="title", type_="STRING")

# description
validator.expect_column_values_to_not_be_null(column="description")
validator.expect_column_values_to_be_of_type(column="description", type_="STRING")
Expectations for
mlops_course.tagsColumn expectations:
# id
validator.expect_column_values_to_be_unique(column="id")

# tag
validator.expect_column_values_to_not_be_null(column="tag")
validator.expect_column_values_to_be_of_type(column="tag", type_="STRING")
检查点
一旦有了一套期望,就可以检查检查点来执行这些期望:
great_expectations checkpoint new projects
当然,这将打开一个交互式note。只需确保以下信息正确(默认值可能不正确):
datasource_name: dwh
data_asset_name: mlops_course.projects
expectation_suite_name: projects
并重复相同的操作为transformers标签suite创建检查点。
任务
定义检查点后,就可以将它们应用于仓库中的数据assert。
GE_ROOT_DIR = Path(BASE_DIR, "great_expectations")

@dag(...)
def dataops():
    ...
    validate_projects = GreatExpectationsOperator(
        task_id="validate_projects",
        checkpoint_name="projects",
        data_context_root_dir=GE_ROOT_DIR,
        fail_task_on_validation_failure=True,
    )
    validate_tags = GreatExpectationsOperator(
        task_id="validate_tags",
        checkpoint_name="tags",
        data_context_root_dir=GE_ROOT_DIR,
        fail_task_on_validation_failure=True,
    )

    # Define DAG
    extract_and_load_projects >> validate_projects
    extract_and_load_tags >> validate_tags
转换
一旦验证了提取和加载的数据,就准备好转换它了。transformers DataOps 工作流程并不特定于任何特定的下游应用程序,因此转换必须具有全局相关性(例如清理缺失数据、聚合等)。就像在transformers数据堆栈课程中一样,将使用dbt来转换transformers数据。然而,这一次,将使用开源dbt-core包以编程方式完成所有工作。
在transformers数据工程存储库的根目录中,使用以下命令初始化transformers dbt 目录:
dbt init dbf_transforms
Which database would you like to use?
[1] bigquery 👈
Desired authentication method option:
[1] oauth
[2] service_account 👈
keyfile: /Users/goku/Downloads/made-with-ml-XXXXXX-XXXXXXXXXXXX.json  # REPLACE
project (GCP project id): made-with-ml-XXXXXX  # REPLACE
dataset: mlops_course
threads: 1
job_execution_timeout_seconds: 300
Desired location option:
[1] US  👈  # or what you picked when defining your dataset in Airbyte DWH destination setup
[2] EU
Models
将像在上一课中使用dbt Cloud IDE一样准备transformers dbt 模型。
cd dbt_transforms
rm -rf models/example
mkdir models/labeled_projects
touch models/labeled_projects/labeled_projects.sql
touch models/labeled_projects/schema.yml
并将以下代码添加到transformers模型文件中:
-- models/labeled_projects/labeled_projects.sql
SELECT p.id, created_on, title, description, tag
FROM `made-with-ml-XXXXXX.mlops_course.projects` p  -- REPLACE
LEFT JOIN `made-with-ml-XXXXXX.mlops_course.tags` t  -- REPLACE
ON p.id = t.id
# models/labeled_projects/schema.yml

version: 2

models:
    - name: labeled_projects
      description: "Tags for all projects"
      columns:
          - name: id
            description: "Unique ID of the project."
            tests:
                - unique
                - not_null
          - name: title
            description: "Title of the project."
            tests:
                - not_null
          - name: description
            description: "Description of the project."
            tests:
                - not_null
          - name: tag
            description: "Labeled tag for the project."
            tests:
                - not_null
可以使用 BashOperator 来执行transformers dbt 命令,如下所示:
DBT_ROOT_DIR = Path(BASE_DIR, "dbt_transforms")

@dag(...)
def dataops():
    ...
    # Transform
    transform = BashOperator(task_id="transform", bash_command=f"cd {DBT_ROOT_DIR} && dbt run && dbt test")

    # Define DAG
    extract_and_load_projects >> validate_projects
    extract_and_load_tags >> validate_tags
    [validate_projects, validate_tags] >> transform
以编程方式使用 dbt Cloud
当在本地开发时,可以轻松地使用 Airflow 的dbt 云提供商连接到transformers dbt 云并使用不同的操作员来安排作业。推荐用于生产,因为可以设计具有适当环境、身份验证、模式等的作业。
- 将 Airflow 与 dbt Cloud 连接:
转到管理 > 连接 > +
Connection ID: dbt_cloud_default
Connection Type: dbt Cloud
Account ID: View in URL of https://cloud.getdbt.com/
API Token: View in https://cloud.getdbt.com/#/profile/api/
- 转换
pip install apache-airflow-providers-dbt-cloud==2.1.0
from airflow.providers.dbt.cloud.operators.dbt import DbtCloudRunJobOperator
transform = DbtCloudRunJobOperator(
    task_id="transform",
    job_id=118680,  # Go to dbt UI > click left menu > Jobs > Transform > job_id in URL
    wait_for_termination=True,  # wait for job to finish running
    check_interval=10,  # check job status
    timeout=300,  # max time for job to execute
)
证实
当然,会希望使用远大的期望来验证超出 dbt 内置方法的转换。将像上面为transformers项目和标签数据assert所做的那样创建一个suite和检查点。
great_expectations suite new # for mlops_course.labeled_projects
Expectations for
mlops_course.labeled_projectsTable expectations
# data leak
validator.expect_compound_columns_to_be_unique(column_list=["title", "description"])
Column expectations:
# id
validator.expect_column_values_to_be_unique(column="id")

# create_on
validator.expect_column_values_to_not_be_null(column="created_on")

# title
validator.expect_column_values_to_not_be_null(column="title")
validator.expect_column_values_to_be_of_type(column="title", type_="STRING")

# description
validator.expect_column_values_to_not_be_null(column="description")
validator.expect_column_values_to_be_of_type(column="description", type_="STRING")

# tag
validator.expect_column_values_to_not_be_null(column="tag")
validator.expect_column_values_to_be_of_type(column="tag", type_="STRING")
great_expectations checkpoint new labeled_projects
datasource_name: dwh
data_asset_name: mlops_course.labeled_projects
expectation_suite_name: labeled_projects
就像为提取和加载的数据添加验证任务一样,可以在 Airflow 中对转换后的数据执行相同的操作:
@dag(...)
def dataops():
    ...
    # Transform
    transform = BashOperator(task_id="transform", bash_command=f"cd {DBT_ROOT_DIR} && dbt run && dbt test")
    validate_transforms = GreatExpectationsOperator(
        task_id="validate_transforms",
        checkpoint_name="labeled_projects",
        data_context_root_dir=GE_ROOT_DIR,
        fail_task_on_validation_failure=True,
    )

    # Define DAG
    extract_and_load_projects >> validate_projects
    extract_and_load_tags >> validate_tags
    [validate_projects, validate_tags] >> transform >> validate_transforms
现在已经定义并执行了整个 DataOps DAG,它将为下游应用程序准备从提取到加载再到转换(并在每个步骤中进行验证)的数据。

通常,会使用传感器在满足条件时触发工作流,或者通过 API 调用等直接从外部源触发它们。对于transformers ML 用例,这可能是定期的,或者在标记或监控工作流时触发重新训练等.
MLOps
准备好数据后,就可以创建许多依赖它的潜在下游应用程序之一。让回到transformersmlops-course项目并按照相同的 Airflow设置说明进行操作(您可以从transformers数据工程项目中停止 Airflow 网络服务器和调度程序,因为将重用端口 8000)。
# Airflow webserver
source venv/bin/activate
export AIRFLOW_HOME=${PWD}/airflow
export GOOGLE_APPLICATION_CREDENTIALS=/Users/goku/Downloads/made-with-ml-XXXXXX-XXXXXXXXXXXX.json # REPLACE
airflow webserver --port 8080
# Go to http://localhost:8080
# Airflow scheduler
source venv/bin/activate
export AIRFLOW_HOME=${PWD}/airflow
export OBJC_DISABLE_INITIALIZE_FORK_SAFETY=YES
export GOOGLE_APPLICATION_CREDENTIALS=~/Downloads/made-with-ml-XXXXXX-XXXXXXXXXXXX.json # REPLACE
airflow scheduler
touch airflow/dags/workflows.py
# airflow/dags/workflows.py
from pathlib import Path
from airflow.decorators import dag
from airflow.utils.dates import days_ago

# Default DAG args
default_args = {
    "owner": "airflow",
    "catch_up": False,
}

@dag(
    dag_id="mlops",
    description="MLOps tasks.",
    default_args=default_args,
    schedule_interval=None,
    start_date=days_ago(2),
    tags=["mlops"],
)
def mlops():
    """MLOps workflows."""
    pass

# Run DAG
ml = mlops()
数据集
已经tagifai.elt_data定义了一个函数来准备transformers数据,但如果想利用数据仓库中的数据,需要连接到它。
pip install google-cloud-bigquery==1.21.0
# airflow/dags/workflows.py
from google.cloud import bigquery
from google.oauth2 import service_account

PROJECT_ID = "made-with-ml-XXXXX" # REPLACE
SERVICE_ACCOUNT_KEY_JSON = "/Users/goku/Downloads/made-with-ml-XXXXXX-XXXXXXXXXXXX.json"  # REPLACE

def _extract_from_dwh():
    """Extract labeled data from
    our BigQuery data warehouse and
    save it locally."""
    # Establish connection to DWH
    credentials = service_account.Credentials.from_service_account_file(SERVICE_ACCOUNT_KEY_JSON)
    client = bigquery.Client(credentials=credentials, project=PROJECT_ID)

    # Query data
    query_job = client.query("""
        SELECT *
        FROM mlops_course.labeled_projects""")
    results = query_job.result()
    results.to_dataframe().to_csv(Path(config.DATA_DIR, "labeled_projects.csv"), index=False)

@dag(
    dag_id="mlops",
    description="MLOps tasks.",
    default_args=default_args,
    schedule_interval=None,
    start_date=days_ago(2),
    tags=["mlops"],
)
def mlops():
    """MLOps workflows."""
    extract_from_dwh = PythonOperator(
        task_id="extract_data",
        python_callable=_extract_from_dwh,
    )

    # Define DAG
    extract_from_dwh
证实
接下来,将使用 Great Expectations 来验证transformers数据。尽管已经验证了transformers数据,但最好的做法是在数据从一个地方移交到另一个地方时测试数据质量。已经labeled_projects在测试课程中为创建了一个检查点,因此将在 MLOps DAG 中利用它。
pip install airflow-provider-great-expectations==0.1.1 great-expectations==0.15.19
from great_expectations_provider.operators.great_expectations import GreatExpectationsOperator
from config import config

GE_ROOT_DIR = Path(config.BASE_DIR, "tests", "great_expectations")

@dag(...)
def mlops():
    """MLOps workflows."""
    extract_from_dwh = PythonOperator(
        task_id="extract_data",
        python_callable=_extract_from_dwh,
    )
    validate = GreatExpectationsOperator(
        task_id="validate",
        checkpoint_name="labeled_projects",
        data_context_root_dir=GE_ROOT_DIR,
        fail_task_on_validation_failure=True,
    )

    # Define DAG
    extract_from_dwh >> validate
train
最后,将使用经过验证的数据优化和训练模型。
from airflow.operators.python_operator import PythonOperator
from config import config
from tagifai import main

@dag(...)
def mlops():
    """MLOps workflows."""
    ...
    optimize = PythonOperator(
        task_id="optimize",
        python_callable=main.optimize,
        op_kwargs={
            "args_fp": Path(config.CONFIG_DIR, "args.json"),
            "study_name": "optimization",
            "num_trials": 1,
        },
    )
    train = PythonOperator(
        task_id="train",
        python_callable=main.train_model,
        op_kwargs={
            "args_fp": Path(config.CONFIG_DIR, "args.json"),
            "experiment_name": "baselines",
            "run_name": "sgd",
        },
    )
这样就定义了 MLOps 工作流,它使用从transformers DataOps 工作流中准备好的数据。此时,可以添加额外的离线/在线评估、部署等任务,流程同上。

持续学习
DataOps 和 MLOps 工作流连接起来创建一个能够持续学习的 ML 系统。这样的系统将指导何时更新、确切更新什么以及如何(轻松)更新。
使用连续(有中断的重复)这个词而不是连续的(没有中断/干预的重复),因为不是要创建一个系统,它会在没有人为干预的情况下自动更新新的传入数据。
监控
transformers生产系统是实时的并受到监控。当感兴趣的事件发生时(例如drift),需要触发几个事件之一:
continue:使用当前部署的模型,没有任何更新。但是,已发出警报,因此应稍后对其进行分析以减少误报警报。improve:通过重新训练模型来避免有意义的漂移(数据、目标、概念等)导致的性能下降。inspect: 做一个决定。通常会重新评估期望,重新评估模式以进行更改,重新评估切片等。rollback:由于当前部署存在问题而导致模型的先前版本。通常可以使用稳健的部署策略(例如暗金丝雀)来避免这些问题。
再培训
如果需要改进模型的现有版本,这不仅仅是在新数据集上重新运行模型创建工作流程这一事实。需要仔细组合训练数据,以避免灾难性遗忘(在呈现新数据时忘记以前学习的模式)等问题。
labeling:新传入的数据在使用前可能需要正确标记(不能只依赖代理标签)。active learning:可能无法明确标记每个新数据点,因此必须利用主动学习工作流程来完成标记过程。QA:质量保证工作流程,以确保标签准确,尤其是对于已知的误报/漏报和历史上表现不佳的数据片段。augmentation:使用代表原始数据集的增强数据增加transformers训练集。sampling:上采样和下采样以解决不平衡的数据切片。evaluation:创建一个评估数据集,该数据集代表模型在部署后将遇到的情况。
一旦有了合适的数据集进行再训练,就可以启动工作流来更新transformers系统!
更多干货,第一时间更新在以下微信公众号:

您的一点点支持,是我后续更多的创造和贡献

转载到请包括本文地址 更详细的转载事宜请参考文章如何转载/引用
本文主体源自以下链接:
@article{madewithml,
    author       = {Goku Mohandas},
    title        = { Made With ML },
    howpublished = {\url{https://madewithml.com/}},
    year         = {2022}
}