Intuition
在本课中,将学习如何测试代码、数据和模型,以构建可以可靠迭代的机器学习系统。测试是确保某些东西按预期工作的一种方式。被激励在开发周期中尽早实施测试并发现错误来源,以便可以降低下游成本和浪费时间。一旦设计了测试,可以在每次更改或添加到代码库时自动执行它们。
tip
强烈建议您在完成之前的课程_后_探索本课程,因为主题(和代码)是迭代开发的。但是,确实创建了 testing-ml存储库,可通过交互式note本快速概览。
测试类型
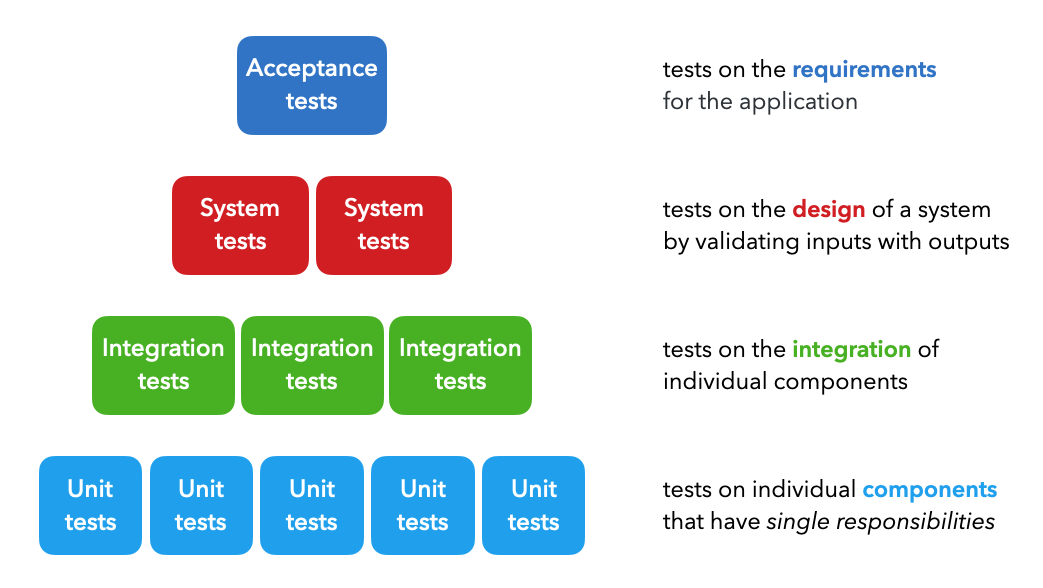
在开发周期的不同阶段使用了四种主要类型的测试:
Unit tests:对每个具有单一职责的单个组件进行测试(例如过滤列表的功能)。Integration tests:测试单个组件的组合功能(例如数据处理)。System tests:对给定输入(例如训练、推理等)的预期输出的系统设计进行测试。Acceptance tests:用于验证是否满足要求的测试,通常称为用户验收测试 (UAT)。Regression tests:基于之前看到的错误的测试,以确保新的更改不会重新引入它们。
虽然 ML 系统本质上是概率性的,但它们由许多确定性组件组成,可以以与传统软件系统类似的方式进行测试。当从测试代码转向测试数据和模型时,测试 ML 系统之间的区别就开始了。
还有许多其他类型的功能和非功能测试,例如冒烟测试(快速健康检查)、性能测试(负载、压力)、安全测试等,但可以在上面的系统测试中概括所有这些.
应该如何测试?
编写测试时使用的框架是Arrange Act Assert方法。
Arrange:设置不同的输入进行测试。Act:将输入应用到要测试的组件上。Assert:确认收到了预期的输出。
Cleaning是此方法的非官方第四步,因为重要的是不要留下可能影响后续测试的先前测试的残留物。可以使用pytest-randomly等包通过随机执行测试来测试状态依赖性。
在 Python 中,有许多工具,例如unittest、pytest等,可以让在遵守_Arrange Act Assert_框架的同时轻松实现测试。这些工具具有强大的内置功能,例如参数化、过滤器等,可以大规模测试许多条件。
应该测试什么?
在_安排_输入和_断言_预期输出时,应该测试输入和输出的哪些方面?
- 输入:数据类型、格式、长度、边缘情况(最小/最大、小/大等)
- 输出:数据类型、格式、异常、中间和最终输出
👉 将在下面介绍与数据和模型有关的测试内容的具体细节。
最佳实践
不管使用什么框架,将测试与开发过程紧密结合是很重要的。
atomic:在创建函数和类时,需要确保它们具有单一的职责,以便可以轻松地测试它们。如果没有,需要将它们拆分成更细粒度的组件。compose:当创建新组件时,希望编写测试来验证它们的功能。这是确保可靠性和及早发现错误的好方法。reuse:应该维护中央存储库,其中核心功能在源头进行测试并在许多项目中重用。这显着减少了每个新项目代码库的测试工作量。regression:想解释回归测试中遇到的新错误,这样就可以确保将来不会重新引入相同的错误。coverage:希望确保代码库100% 覆盖。这并不意味着要为每一行代码编写测试,而是要考虑每一行代码。automate:如果忘记在提交到存储库之前运行测试,希望在对代码库进行更改时自动运行测试。将在后续课程中学习如何使用预提交hook在本地执行此操作,并通过GitHub 操作远程执行此操作。
测试驱动开发
测试驱动开发 (TDD)是在编写功能之前编写测试以确保始终编写测试的过程。这与先编写功能然后再编写测试形成对比。以下是对此的查看:
- 随着进步编写测试很好,但这确实意味着 100% 的正确性。
- 在进入代码或测试之前,最初的时间应该花在设计上。
如果这些测试没有意义并且不包含可能的输入、中间体和输出的领域,那么完美的覆盖并不意味着应用程序没有错误。因此,应该在面临错误时朝着更好的设计和敏捷性努力,快速解决它们并围绕它们编写测试用例以避免下一次。
应用
在应用程序中,将测试代码、数据和模型。将首先创建一个tests带有code子目录的单独目录来测试tagifai脚本。将在下面创建用于测试数据和模型的子目录。
mkdir tests
cd tests
mkdir app config model tagifai
touch <SCRIPTS>
cd ../
tests/
└── code/
│   ├── test_data.py
│   ├── test_evaluate.py
│   ├── test_main.py
│   ├── test_predict.py
│   └── test_utils.py
在学习了本课中的所有概念_后_,请随意编写测试并将它们组织在这些脚本中。建议使用tests在 GitHub 上的目录作为参考。
请注意,
tagifai/train.py脚本没有相应的tests/code/test_train.py. 一些脚本具有带有依赖项(例如工件)的大型函数(例如train.train()、train.optimize()、等),通过.predict.predict()tests/code/test_main.py
🧪 Pytest
将使用pytest作为测试框架,因为它具有强大的内置功能,例如参数化、固定装置、标记等。
pip install pytest==7.1.2
由于这个测试包不是核心机器学习操作的组成部分,让在中创建一个单独的列表setup.py并将其添加到extras_require:
# setup.py
test_packages = [
    "pytest==7.1.2",
]

# Define our package
setup(
    ...
    extras_require={
        "dev": docs_packages + style_packages + test_packages,
        "docs": docs_packages,
        "test": test_packages,
    },
)
创建了一个明确的test选项,因为用户只想下载测试包。当使用CI/CD 工作流通过 GitHub Actions 运行测试时,将看到这一点。
配置
Pytest 期望测试在tests默认情况下组织在一个目录下。但是,也可以添加到现有pyproject.toml文件中以配置任何其他测试目录。进入目录后,pytest 会查找以 开头的 python 脚本,tests_*.py但也可以将其配置为读取任何其他文件模式。
# Pytest
[tool.pytest.ini_options]
testpaths = ["tests"]
python_files = "test_*.py"
断言
让看看样本测试及其结果是什么样的。假设有一个简单的函数来确定水果是否脆:
# food/fruits.py
def is_crisp(fruit):
    if fruit:
        fruit = fruit.lower()
    if fruit in ["apple", "watermelon", "cherries"]:
        return True
    elif fruit in ["orange", "mango", "strawberry"]:
        return False
    else:
        raise ValueError(f"{fruit} not in known list of fruits.")
    return False
为了测试这个功能,可以使用断言语句来映射输入和预期的输出。单词后面的语句assert必须返回 True。
# tests/food/test_fruits.py
def test_is_crisp():
    assert is_crisp(fruit="apple")
    assert is_crisp(fruit="Apple")
    assert not is_crisp(fruit="orange")
    with pytest.raises(ValueError):
        is_crisp(fruit=None)
        is_crisp(fruit="pear")
还可以对异常进行断言,就像在第 6-8 行中所做的那样,其中 with 语句下的所有操作都应该引发指定的异常。
assert在项目中使用的例子# tests/code/test_evaluate.py def test_get_metrics(): y_true = np.array([0, 0, 1, 1]) y_pred = np.array([0, 1, 0, 1]) classes = ["a", "b"] performance = evaluate.get_metrics(y_true=y_true, y_pred=y_pred, classes=classes, df=None) assert performance["overall"]["precision"] == 2/4 assert performance["overall"]["recall"] == 2/4 assert performance["class"]["a"]["precision"] == 1/2 assert performance["class"]["a"]["recall"] == 1/2 assert performance["class"]["b"]["precision"] == 1/2 assert performance["class"]["b"]["recall"] == 1/2
执行
可以使用几个不同的粒度级别执行上面的测试:
python3 -m pytest                                           # all tests
python3 -m pytest tests/food                                # tests under a directory
python3 -m pytest tests/food/test_fruits.py                 # tests for a single file
python3 -m pytest tests/food/test_fruits.py::test_is_crisp  # tests for a single function
在上面运行特定测试将产生以下输出:
python3 -m pytest tests/food/test_fruits.py::test_is_crisp
tests/food/test_fruits.py::test_is_crisp . [100%]
如果在此测试中的任何断言失败,将看到失败的断言,以及函数的预期和实际输出。
tests/food/test_fruits.py F                          [100%]

    def test_is_crisp():
>       assert is_crisp(fruit="orange")
E       AssertionError: assert False
E        +  where False = is_crisp(fruit='orange')
tip
重要的是要测试上面概述的各种输入和预期输出,并且永远不要假设测试是微不足道的。在上面的例子中,如果函数没有考虑大小写,测试“apple”和“Apple”是很重要的!
Classes
还可以通过创建测试类来测试类及其各自的功能。在测试类中,可以选择定义在设置或拆除类实例或使用类方法时自动执行的函数。
setup_class:为任何类实例设置状态。teardown_class: 拆除 setup_class 中创建的状态。setup_method:在每个方法之前调用以设置任何状态。teardown_method:在每个方法之后调用以拆除任何状态。
class Fruit(object):
    def __init__(self, name):
        self.name = name

class TestFruit(object):
    @classmethod
    def setup_class(cls):
        """Set up the state for any class instance."""
        pass

    @classmethod
    def teardown_class(cls):
        """Teardown the state created in setup_class."""
        pass

    def setup_method(self):
        """Called before every method to setup any state."""
        self.fruit = Fruit(name="apple")

    def teardown_method(self):
        """Called after every method to teardown any state."""
        del self.fruit

    def test_init(self):
        assert self.fruit.name == "apple"
可以通过指定类名来为类执行所有测试:
python3 -m pytest tests/food/test_fruits.py::TestFruit
tests/food/test_fruits.py::TestFruit . [100%]
class在项目中测试 的示例# tests/code/test_data.py class TestLabelEncoder: @classmethod def setup_class(cls): """Called before every class initialization.""" pass @classmethod def teardown_class(cls): """Called after every class initialization.""" pass def setup_method(self): """Called before every method.""" self.label_encoder = data.LabelEncoder() def teardown_method(self): """Called after every method.""" del self.label_encoder def test_empty_init(self): label_encoder = data.LabelEncoder() assert label_encoder.index_to_class == {} assert len(label_encoder.classes) == 0 def test_dict_init(self): class_to_index = {"apple": 0, "banana": 1} label_encoder = data.LabelEncoder(class_to_index=class_to_index) assert label_encoder.index_to_class == {0: "apple", 1: "banana"} assert len(label_encoder.classes) == 2 def test_len(self): assert len(self.label_encoder) == 0 def test_save_and_load(self): with tempfile.TemporaryDirectory() as dp: fp = Path(dp, "label_encoder.json") self.label_encoder.save(fp=fp) label_encoder = data.LabelEncoder.load(fp=fp) assert len(label_encoder.classes) == 0 def test_str(self): assert str(data.LabelEncoder()) == "<LabelEncoder(num_classes=0)>" def test_fit(self): label_encoder = data.LabelEncoder() label_encoder.fit(["apple", "apple", "banana"]) assert "apple" in label_encoder.class_to_index assert "banana" in label_encoder.class_to_index assert len(label_encoder.classes) == 2 def test_encode_decode(self): class_to_index = {"apple": 0, "banana": 1} y_encoded = [0, 0, 1] y_decoded = ["apple", "apple", "banana"] label_encoder = data.LabelEncoder(class_to_index=class_to_index) label_encoder.fit(["apple", "apple", "banana"]) assert np.array_equal(label_encoder.encode(y_decoded), np.array(y_encoded)) assert label_encoder.decode(y_encoded) == y_decoded
参数化
到目前为止,在测试中,必须创建单独的断言语句来验证输入和预期输出的不同组合。然而,这里有一点冗余,因为输入总是作为参数输入到函数中,并且输出与预期输出进行比较。为了消除这种冗余,pytest 有一个@pytest.mark.parametrize装饰器,它允许将输入和输出表示为参数。
@pytest.mark.parametrize(
    "fruit, crisp",
    [
        ("apple", True),
        ("Apple", True),
        ("orange", False),
    ],
)
def test_is_crisp_parametrize(fruit, crisp):
    assert is_crisp(fruit=fruit) == crisp
python3 -m pytest tests/food/test_is_crisp_parametrize.py ... [100%]
[Line 2]:定义装饰器下的参数名称,例如。“fruit, crisp”(注意这是一个字符串)。[Lines 3-7]:提供步骤 1 中参数的值组合列表。[Line 9]:将参数名称传递给测试函数。[Line 10]:包括必要的断言语句,这些语句将为步骤 2 中列表中的每个组合执行。
同样,也可以传入一个异常作为预期结果:
@pytest.mark.parametrize(
    "fruit, exception",
    [
        ("pear", ValueError),
    ],
)
def test_is_crisp_exceptions(fruit, exception):
    with pytest.raises(exception):
        is_crisp(fruit=fruit)
parametrize项目中的示例# tests/code/test_data.py from tagifai import data @pytest.mark.parametrize( "text, lower, stem, stopwords, cleaned_text", [ ("Hello worlds", False, False, [], "Hello worlds"), ("Hello worlds", True, False, [], "hello worlds"), ... ], ) def test_preprocess(text, lower, stem, stopwords, cleaned_text): assert ( data.clean_text( text=text, lower=lower, stem=stem, stopwords=stopwords, ) == cleaned_text )
Fixtures
参数化允许减少测试函数内部的冗余,但是如何减少不同测试函数之间的冗余呢?例如,假设不同的函数都有一个数据框作为输入。在这里,可以使用pytest的内置fixture,它是一个在test函数之前执行的函数。
@pytest.fixture
def my_fruit():
    fruit = Fruit(name="apple")
    return fruit

def test_fruit(my_fruit):
    assert my_fruit.name == "apple"
请注意,fixture 的名称和 test 函数的输入是相同的 (
my_fruit)。
也可以将fixture 应用到类中,当调用类中的任何方法时都会调用fixture 函数。
@pytest.mark.usefixtures("my_fruit")
class TestFruit:
    ...
fixtures项目中的示例在transformers项目中,使用固定装置有效地将一组输入(例如 Pandas DataFrame)传递给需要它们的不同测试功能(清理、拆分等)。
# tests/code/test_data.py
@pytest.fixture(scope="module")
def df():
    data = [
        {"title": "a0", "description": "b0", "tag": "c0"},
        {"title": "a1", "description": "b1", "tag": "c1"},
        {"title": "a2", "description": "b2", "tag": "c1"},
        {"title": "a3", "description": "b3", "tag": "c2"},
        {"title": "a4", "description": "b4", "tag": "c2"},
        {"title": "a5", "description": "b5", "tag": "c2"},
    ]
    df = pd.DataFrame(data * 10)
    return df


@pytest.mark.parametrize(
    "labels, unique_labels",
    [
        ([], ["other"]),  # no set of approved labels
        (["c3"], ["other"]),  # no overlap b/w approved/actual labels
        (["c0"], ["c0", "other"]),  # partial overlap
        (["c0", "c1", "c2"], ["c0", "c1", "c2"]),  # complete overlap
    ],
)
def test_replace_oos_labels(df, labels, unique_labels):
    replaced_df = data.replace_oos_labels(
        df=df.copy(), labels=labels, label_col="tag", oos_label="other"
    )
    assert set(replaced_df.tag.unique()) == set(unique_labels)
请注意,不在参数化测试函数
df中直接使用fixture(传入)。df.copy()如果这样做了,那么将df在每次参数化后更改 的值。Tip
在围绕数据集创建固定装置时,最佳做法是创建一个仍然遵循相同模式的简化版本。例如,在上面的数据框固定装置中,正在创建一个较小的数据框,它仍然具有与实际数据框相同的列名。虽然可以加载transformers实际数据集,但随着transformers数据集随时间变化(新标签、删除标签、非常大的数据集等),它可能会导致问题
Fixtures 可以有不同的范围,这取决于如何使用它们。例如,dffixture具有模块范围,因为不想在每次测试后都重新创建它,而是希望为模块中的所有测试只创建一次(tests/test_data.py)。
function: 每次测试后,fixture 都会被销毁。[default]class:fixture在类中的最后一次测试后被销毁。module:fixture在模块(脚本)中的最后一次测试后被销毁。package:fixture在包中的最后一次测试后被销毁。session:fixture在会话的最后一次测试后被销毁。
功能是最低级别的范围,而会话是最高级别。首先执行最高级别的范围固定装置。
通常,当在一个特定的测试文件中有许多fixture时,可以将它们全部组织在一个
fixtures.py脚本中并根据需要调用它们。
标记
已经能够以各种粒度级别(所有测试、脚本、函数等)执行测试,但可以使用标记创建自定义粒度。已经使用了一种类型的标记(参数化),但还有其他几种内置标记。例如,skipif如果满足条件,标记允许跳过测试的执行。例如,假设只想在 GPU 可用时测试训练模型:
@pytest.mark.skipif(
    not torch.cuda.is_available(),
    reason="Full training tests require a GPU."
)
def test_training():
    pass
除了一些保留的标记名称外,还可以创建自己的自定义标记。
@pytest.mark.fruits
def test_fruit(my_fruit):
    assert my_fruit.name == "apple"
-m可以使用需要(区分大小写)标记表达式的标志来执行它们,如下所示:
pytest -m "fruits"      #  runs all tests marked with `fruits`
pytest -m "not fruits"  #  runs all tests besides those marked with `fruits`
tip
使用标记的正确方法是明确列出在pyproject.toml文件中创建的标记。在这里,可以指定必须在此文件中使用
--strict-markers标志定义所有标记,然后在markers列表中声明标记(以及有关它们的一些信息):@pytest.mark.training def test_train_model(): assert ...
# Pytest
[tool.pytest.ini_options]
testpaths = ["tests"]
python_files = "test_*.py"
addopts = "--strict-markers --disable-pytest-warnings"
markers = [
    "training: tests that involve training",
]
完成此操作后,可以通过执行查看所有现有的标记列表,
pytest --markers当尝试使用此处未定义的新标记时会收到错误消息。
覆盖范围
当为应用程序的组件开发测试时,重要的是要知道对代码库的覆盖程度以及知道是否遗漏了任何东西。可以使用Coverage库来跟踪和可视化测试占代码库的多少。使用 pytest,由于pytest-cov插件,使用这个包变得更加容易。
pip install pytest-cov==2.10.1
将把它添加到setup.py脚本中:
# setup.py
test_packages = [
    "pytest==7.1.2",
    "pytest-cov==2.10.1"
]
python3 -m pytest --cov tagifai --cov-report html
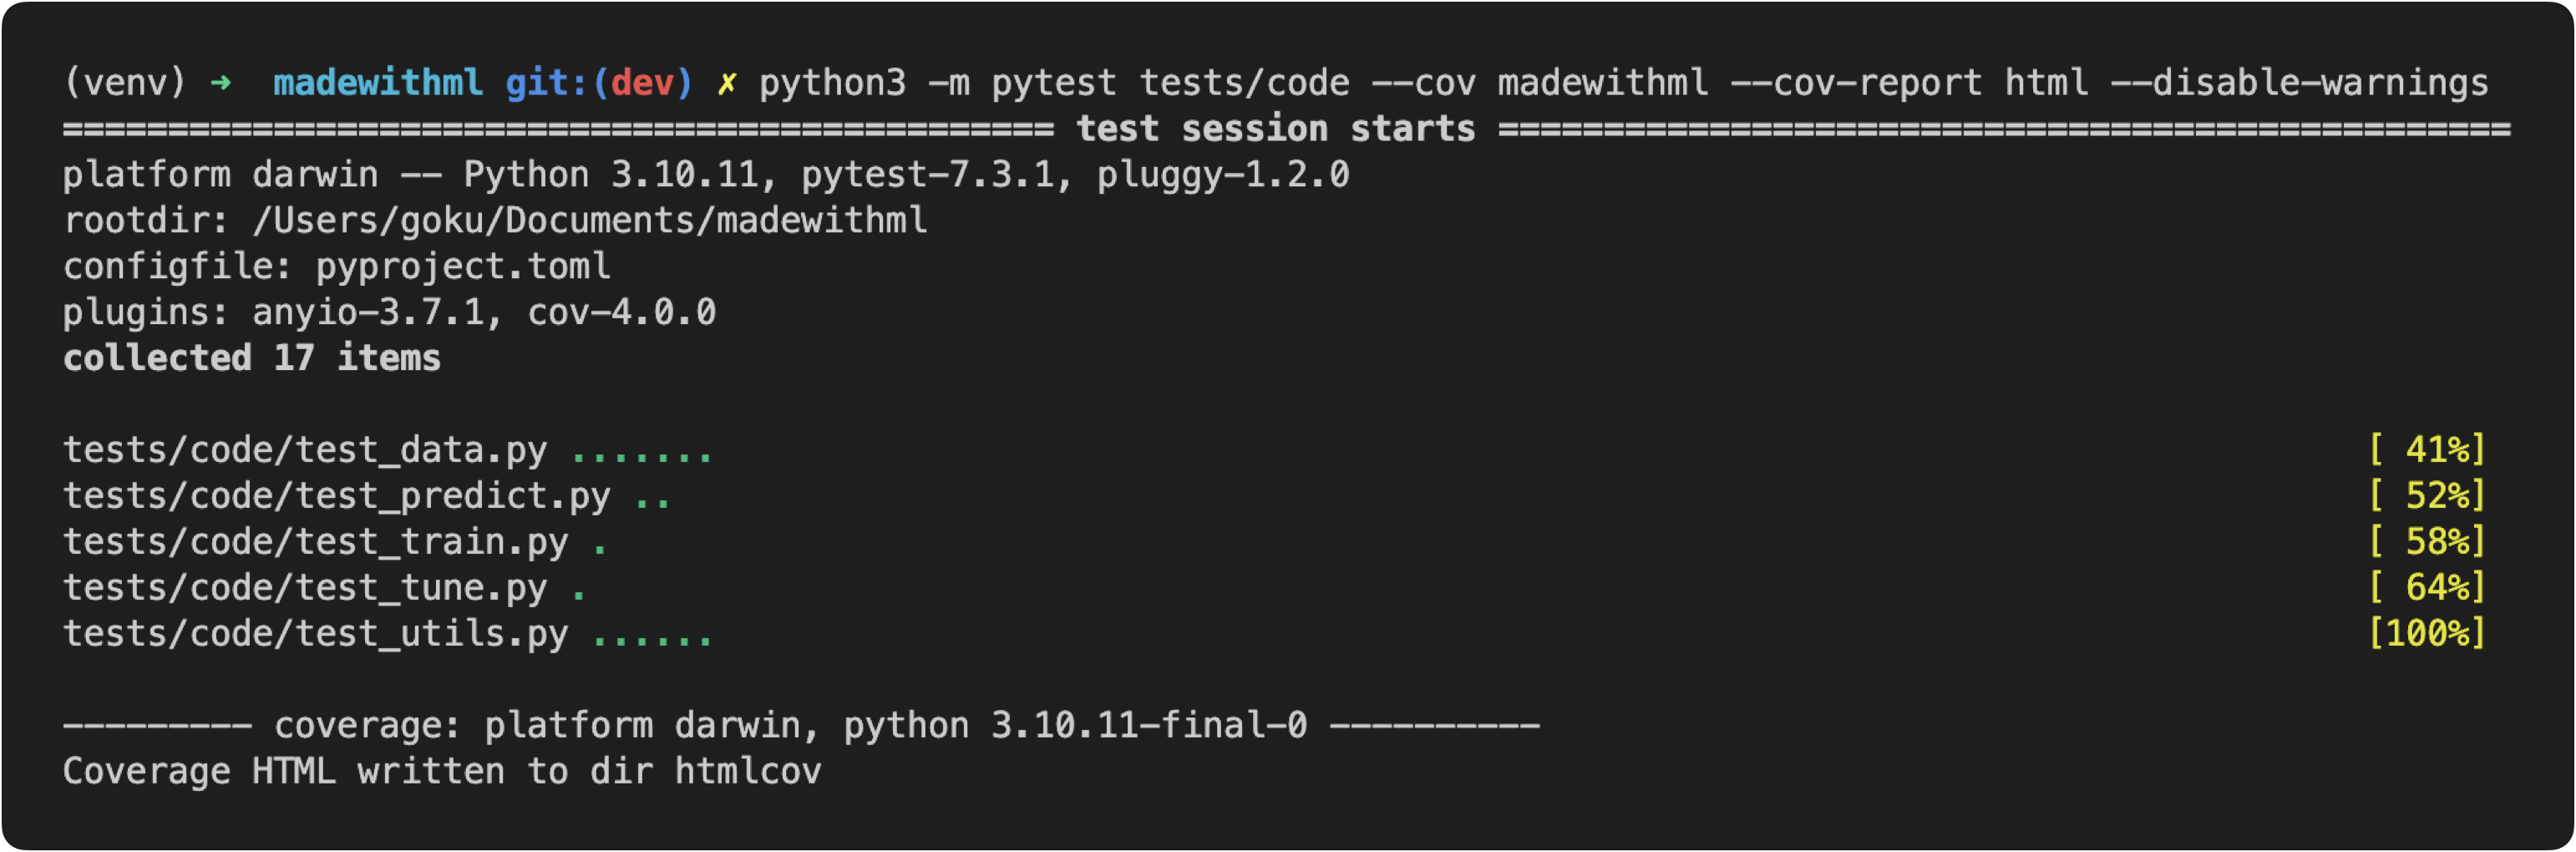
在这里,要求覆盖 tagifai 和 app 目录中的所有代码,并以 HTML 格式生成报告。当运行它时,将看到测试目录中的测试正在执行,而覆盖插件正在跟踪应用程序中的哪些行正在执行。测试完成后,可以查看生成的报告(默认为htmlcov/index.html)并单击各个文件以查看哪些部分未被任何测试覆盖。当忘记测试某些条件、异常等时,这尤其有用。
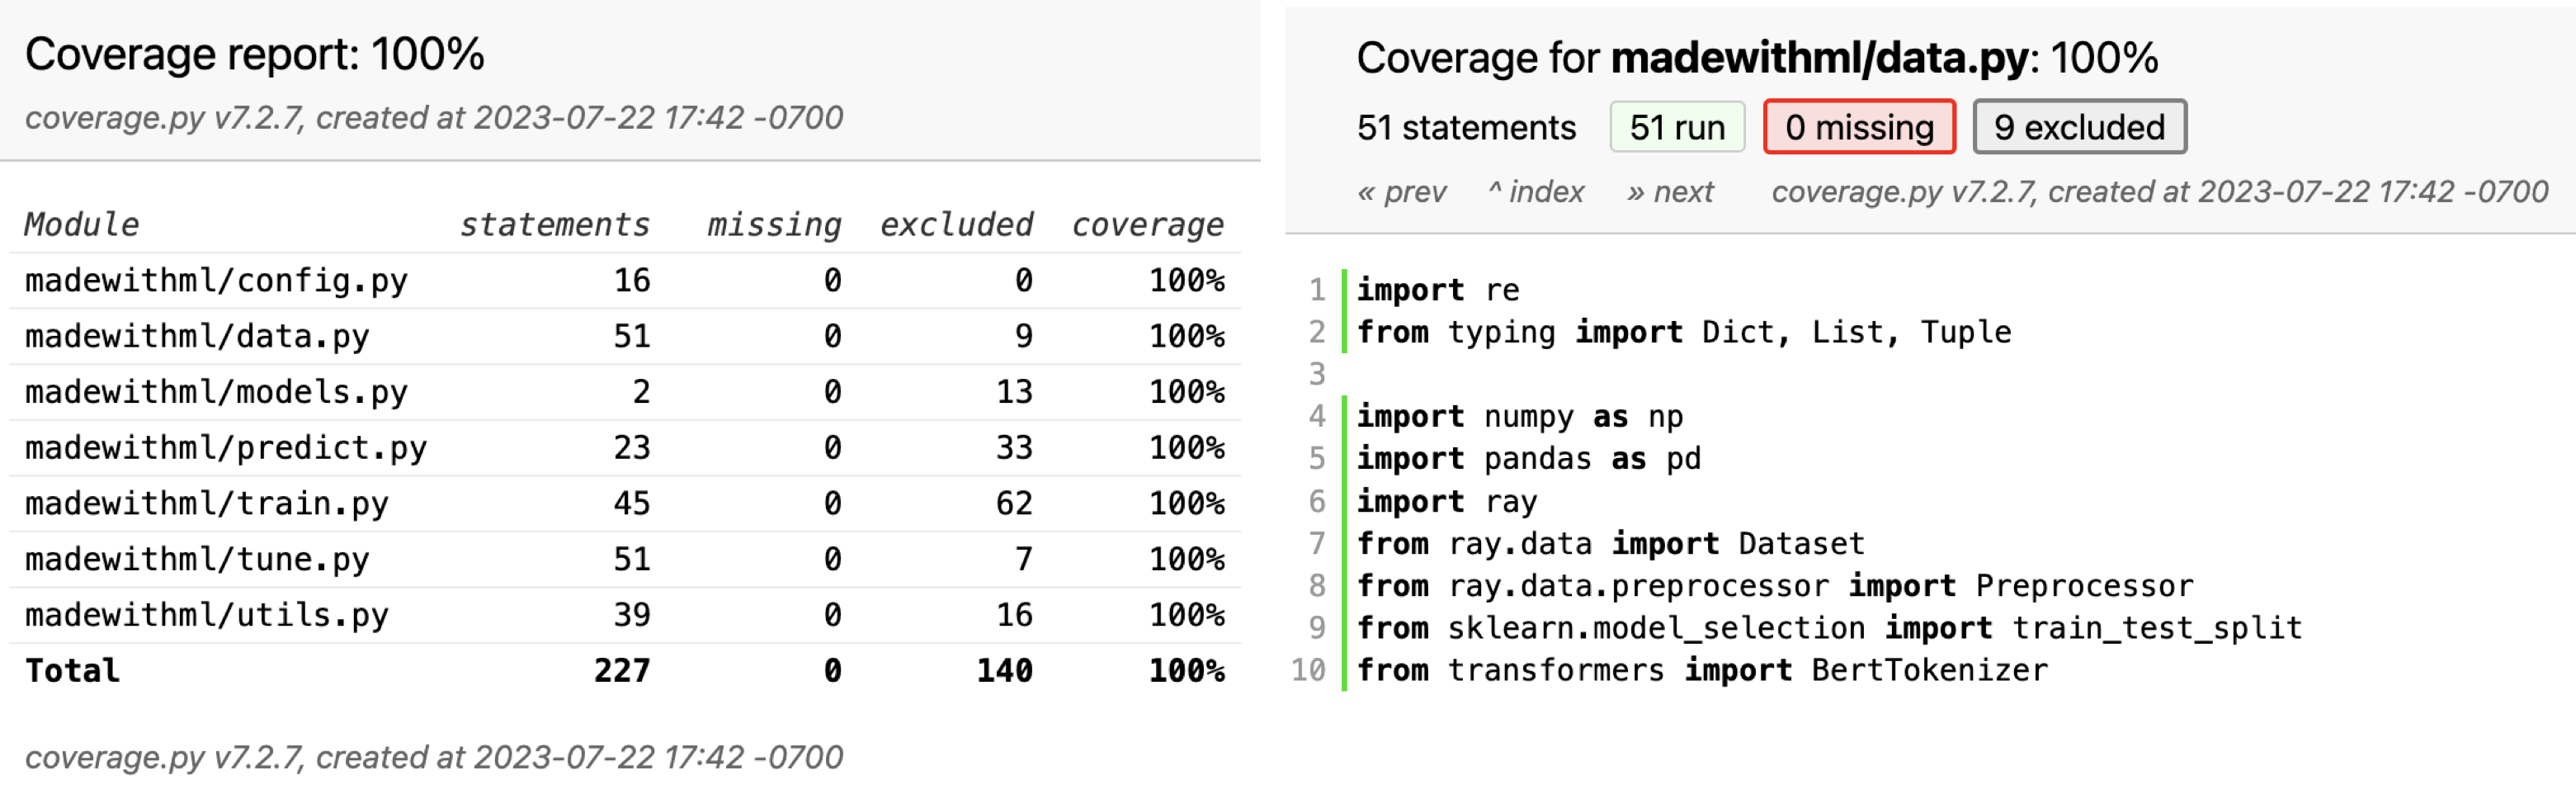
warning
虽然有 100% 的覆盖率,但这并不意味着应用程序是完美的。覆盖率只是表示在测试中执行的一段代码,不一定是它的每一部分都经过测试,更不用说彻底测试了。因此,覆盖率永远不应被用作正确性的表示。但是,将覆盖率保持在 100% 非常有用,这样就可以知道新功能何时尚未测试。在 CI/CD 课程中,将了解在推送到特定分支时如何使用 GitHub 操作来实现 100% 的覆盖率。
排除项
有时编写测试来覆盖应用程序中的每一行是没有意义的,但仍然希望考虑这些行,以便可以保持 100% 的覆盖率。应用排除时,有两个级别的权限:
-
通过添加此评论来原谅行
# pragma: no cover, <MESSAGE>if trial: # pragma: no cover, optuna pruning trial.report(val_loss, epoch) if trial.should_prune(): raise optuna.TrialPruned() -
pyproject.toml通过在配置中指定文件来排除文件:# Pytest coverage [tool.coverage.run] omit = ["app/gunicorn.py"]
重点是能够通过评论为这些排除项添加理由,以便团队可以遵循推理。
现在已经有了测试传统软件的基础,让在机器学习系统的背景下深入测试数据和模型。
数据
到目前为止,已经使用单元测试和集成测试来测试与transformers数据交互的功能,但还没有测试数据本身的有效性。将使用great expectations库来测试transformers数据预期的样子。它是一个库,使能够以标准化的方式创建关于transformers数据应该是什么样子的期望。它还提供了与后端数据源(如本地文件系统、S3、数据库等)无缝连接的模块。让通过实现对应用程序所需的期望来探索该库。
👉跟随交互式note在 testing-ml存储库,因为实现了以下概念。
pip install great-expectations==0.15.15
将把它添加到transformerssetup.py脚本中:
# setup.py
test_packages = [
    "pytest==7.1.2",
    "pytest-cov==2.10.1",
    "great-expectations==0.15.15"
]
首先,将加载想要应用transformers期望的数据。可以从各种来源(文件系统、数据库、云等)加载transformers数据,然后可以将其包装在一个数据集模块(Pandas/Spark DataFrame、SQLAlchemy)中。
import great_expectations as ge
import json
import pandas as pd
from urllib.request import urlopen
# Load labeled projects
projects = pd.read_csv("https://raw.githubusercontent.com/GokuMohandas/Made-With-ML/main/datasets/projects.csv")
tags = pd.read_csv("https://raw.githubusercontent.com/GokuMohandas/Made-With-ML/main/datasets/tags.csv")
df = ge.dataset.PandasDataset(pd.merge(projects, tags, on="id"))
print (f"{len(df)} projects")
df.head(5)
| id | created_on | title | description | tag | |
|---|---|---|---|---|---|
| 0 | 6 | 2020-02-20 06:43:18 | Comparison between YOLO and RCNN on real world… | Bringing theory to experiment is cool. We can … | computer-vision |
| 1 | 7 | 2020-02-20 06:47:21 | Show, Infer & Tell: Contextual Inference for C… | The beauty of the work lies in the way it arch… | computer-vision |
| 2 | 9 | 2020-02-24 16:24:45 | Awesome Graph Classification | A collection of important graph embedding, cla… | graph-learning |
| 3 | 15 | 2020-02-28 23:55:26 | Awesome Monte Carlo Tree Search | A curated list of Monte Carlo tree search papers… | reinforcement-learning |
| 4 | 19 | 2020-03-03 13:54:31 | Diffusion to Vector | Reference implementation of Diffusion2Vec (Com… | graph-learning |
期望
在对transformers数据应该是什么样子建立期望时,要考虑transformers整个数据集和其中的所有特征(列)。
# Presence of specific features df.expect_table_columns_to_match_ordered_list( column_list=["id", "created_on", "title", "description", "tag"] )
# Unique combinations of features (detect data leaks!) df.expect_compound_columns_to_be_unique(column_list=["title", "description"])
# Missing values df.expect_column_values_to_not_be_null(column="tag")
# Unique values df.expect_column_values_to_be_unique(column="id")
# Type adherence df.expect_column_values_to_be_of_type(column="title", type_="str")
# List (categorical) / range (continuous) of allowed values tags = ["computer-vision", "graph-learning", "reinforcement-learning", "natural-language-processing", "mlops", "time-series"] df.expect_column_values_to_be_in_set(column="tag", value_set=tags)
这些期望中的每一个都会创建一个输出,其中包含有关成功或失败、预期和观察到的值、提出的期望等详细信息。例如,如果成功,期望将产生以下内容:df.expect_column_values_to_be_of_type(column="title", type_="str")
{ “exception_info”: { “raised_exception”: false, “exception_traceback”: null, “exception_message”: null }, “success”: true, “meta”: {}, “expectation_config”: { “kwargs”: { “column”: “title”, “type_”: “str”, “result_format”: “BASIC” }, “meta”: {}, “expectation_type”: “_expect_column_values_to_be_of_type__map” }, “result”: { “element_count”: 955, “missing_count”: 0, “missing_percent”: 0.0, “unexpected_count”: 0, “unexpected_percent”: 0.0, “unexpected_percent_nonmissing”: 0.0, “partial_unexpected_list”: [] } }
如果有一个失败的期望(例如),会收到这个输出(注意导致失败的原因的计数和示例): df.expect_column_values_to_be_of_type(column="title", type_="int")
{ “success”: false, “exception_info”: { “raised_exception”: false, “exception_traceback”: null, “exception_message”: null }, “expectation_config”: { “meta”: {}, “kwargs”: { “column”: “title”, “type_”: “int”, “result_format”: “BASIC” }, “expectation_type”: “_expect_column_values_to_be_of_type__map” }, “result”: { “element_count”: 955, “missing_count”: 0, “missing_percent”: 0.0, “unexpected_count”: 955, “unexpected_percent”: 100.0, “unexpected_percent_nonmissing”: 100.0, “partial_unexpected_list”: [ “How to Deal with Files in Google Colab: What You Need to Know”, “Machine Learning Methods Explained (+ Examples)”, “OpenMMLab Computer Vision”, “…”, ] }, “meta”: {} }
可以创造一些不同的期望。一定要探索所有的期望,包括自定义期望。以下是一些与transformers特定数据集无关但广泛适用的其他流行期望:
- 特征值与其他特征值的关系 →
expect_column_pair_values_a_to_be_greater_than_b - 样本的行数(精确或范围)→
expect_table_row_count_to_be_between - 数值统计(均值、标准差、中位数、最大值、最小值、总和等)→
expect_column_mean_to_be_between
组织
在组织期望时,建议从表级开始,然后转到各个功能列。
Table expectations
# columns
df.expect_table_columns_to_match_ordered_list(
    column_list=["id", "created_on", "title", "description", "tag"])

# data leak
df.expect_compound_columns_to_be_unique(column_list=["title", "description"])
Column期望
# id
df.expect_column_values_to_be_unique(column="id")

# created_on
df.expect_column_values_to_not_be_null(column="created_on")
df.expect_column_values_to_match_strftime_format(
    column="created_on", strftime_format="%Y-%m-%d %H:%M:%S")

# title
df.expect_column_values_to_not_be_null(column="title")
df.expect_column_values_to_be_of_type(column="title", type_="str")

# description
df.expect_column_values_to_not_be_null(column="description")
df.expect_column_values_to_be_of_type(column="description", type_="str")

# tag
df.expect_column_values_to_not_be_null(column="tag")
df.expect_column_values_to_be_of_type(column="tag", type_="str")
可以将所有期望组合在一起以创建一个Expectation Suite对象,可以使用它来验证任何数据集模块。
# Expectation suite
expectation_suite = df.get_expectation_suite(discard_failed_expectations=False)
print(df.validate(expectation_suite=expectation_suite, only_return_failures=True))
{
  "success": true,
  "results": [],
  "statistics": {
    "evaluated_expectations": 11,
    "successful_expectations": 11,
    "unsuccessful_expectations": 0,
    "success_percent": 100.0
  },
  "evaluation_parameters": {}
}
项目
到目前为止,已经在临时脚本/note级别使用了 Great Expectations 库,但可以通过创建一个项目来进一步组织transformers期望。
cd tests
great_expectations init
这将建立一个tests/great_expectations具有以下结构的目录:
tests/great_expectations/
├── checkpoints/
├── expectations/
├── plugins/
├── uncommitted/
├── .gitignore
└── great_expectations.yml
数据源
第一步是建立transformersdatasource,告诉 Great Expectations transformers数据在哪里:
great_expectations datasource new
What data would you like Great Expectations to connect to?
    1. Files on a filesystem (for processing with Pandas or Spark) 👈
    2. Relational database (SQL)
What are you processing your files with?
1. Pandas 👈
2. PySpark
Enter the path of the root directory where the data files are stored: ../data
Suites
手动、交互或自动创建期望并将它们保存为suite(对特定数据assert的一组期望)。
great_expectations suite new
How would you like to create your Expectation Suite?
    1. Manually, without interacting with a sample batch of data (default)
    2. Interactively, with a sample batch of data 👈
    3. Automatically, using a profiler
Which data asset (accessible by data connector "default_inferred_data_connector_name") would you like to use?
    1. labeled_projects.csv
    2. projects.csv 👈
    3. tags.csv
Name the new Expectation Suite [projects.csv.warning]: projects
这将打开一个交互式note,可以在其中添加期望。复制并粘贴下面的期望并运行所有单元格。tags.csv对和重复此步骤labeled_projects.csv。

Expectations for
projects.csvTable expectations
# Presence of features
validator.expect_table_columns_to_match_ordered_list(
    column_list=["id", "created_on", "title", "description"])
validator.expect_compound_columns_to_be_unique(column_list=["title", "description"])  # data leak
Column expectations:
# id
validator.expect_column_values_to_be_unique(column="id")

# create_on
validator.expect_column_values_to_not_be_null(column="created_on")
validator.expect_column_values_to_match_strftime_format(
    column="created_on", strftime_format="%Y-%m-%d %H:%M:%S")

# title
validator.expect_column_values_to_not_be_null(column="title")
validator.expect_column_values_to_be_of_type(column="title", type_="str")

# description
validator.expect_column_values_to_not_be_null(column="description")
validator.expect_column_values_to_be_of_type(column="description", type_="str")
Expectations for
tags.csvTable expectations
# Presence of features
validator.expect_table_columns_to_match_ordered_list(column_list=["id", "tag"])
Column expectations:
# id
validator.expect_column_values_to_be_unique(column="id")

# tag
validator.expect_column_values_to_not_be_null(column="tag")
validator.expect_column_values_to_be_of_type(column="tag", type_="str")
Expectations for
labeled_projects.csvTable expectations
# Presence of features
validator.expect_table_columns_to_match_ordered_list(
    column_list=["id", "created_on", "title", "description", "tag"])
validator.expect_compound_columns_to_be_unique(column_list=["title", "description"])  # data leak
Column expectations:
# id
validator.expect_column_values_to_be_unique(column="id")

# create_on
validator.expect_column_values_to_not_be_null(column="created_on")
validator.expect_column_values_to_match_strftime_format(
    column="created_on", strftime_format="%Y-%m-%d %H:%M:%S")

# title
validator.expect_column_values_to_not_be_null(column="title")
validator.expect_column_values_to_be_of_type(column="title", type_="str")

# description
validator.expect_column_values_to_not_be_null(column="description")
validator.expect_column_values_to_be_of_type(column="description", type_="str")

# tag
validator.expect_column_values_to_not_be_null(column="tag")
validator.expect_column_values_to_be_of_type(column="tag", type_="str")
所有这些期望都保存在great_expectations/expectations:
great_expectations/
├── expectations/
│   ├── labeled_projects.csv
│   ├── projects.csv
│   └── tags.csv
还可以列出suite:
great_expectations suite list
Using v3 (Batch Request) API
3 Expectation Suites found:
 - labeled_projects
 - projects
 - tags
要编辑suite,可以执行以下 CLI 命令:
great_expectations suite edit <SUITE_NAME>
检查点
创建检查点,其中将一组期望应用于特定数据assert。这是一种以编程方式在现有的和新的数据源上应用检查点的好方法。
cd tests great_expectations checkpoint new CHECKPOINT_NAME
所以对于transformers项目,它将是:
great_expectations checkpoint new projects
great_expectations checkpoint new tags
great_expectations checkpoint new labeled_projects
这些检查点创建调用中的每一个都将启动一个note,可以在其中定义要将此检查点应用于哪些suite。必须更改data_asset_name(运行检查点suite的数据assert)和expectation_suite_name(要使用的suite的名称)的行。例如,projects检查点将使用projects.csv数据assert和projectssuite。
只要架构和验证适用,检查点就可以共享同一个suite。
my_checkpoint_name = "projects"  # This was populated from your CLI command.

yaml_config = f"""
name: {my_checkpoint_name}
config_version: 1.0
class_name: SimpleCheckpoint
run_name_template: "%Y%m%d-%H%M%S-my-run-name-template"
validations:
  - batch_request:
      datasource_name: local_data
      data_connector_name: default_inferred_data_connector_name
      data_asset_name: projects.csv
      data_connector_query:
        index: -1
    expectation_suite_name: projects
"""
print(yaml_config)
验证自动填充
一定要确保
datasource_name,data_asset_name和expectation_suite_name都是希望它们成为的样子(Great Expectations 自动填充那些可能并不总是准确的假设)。
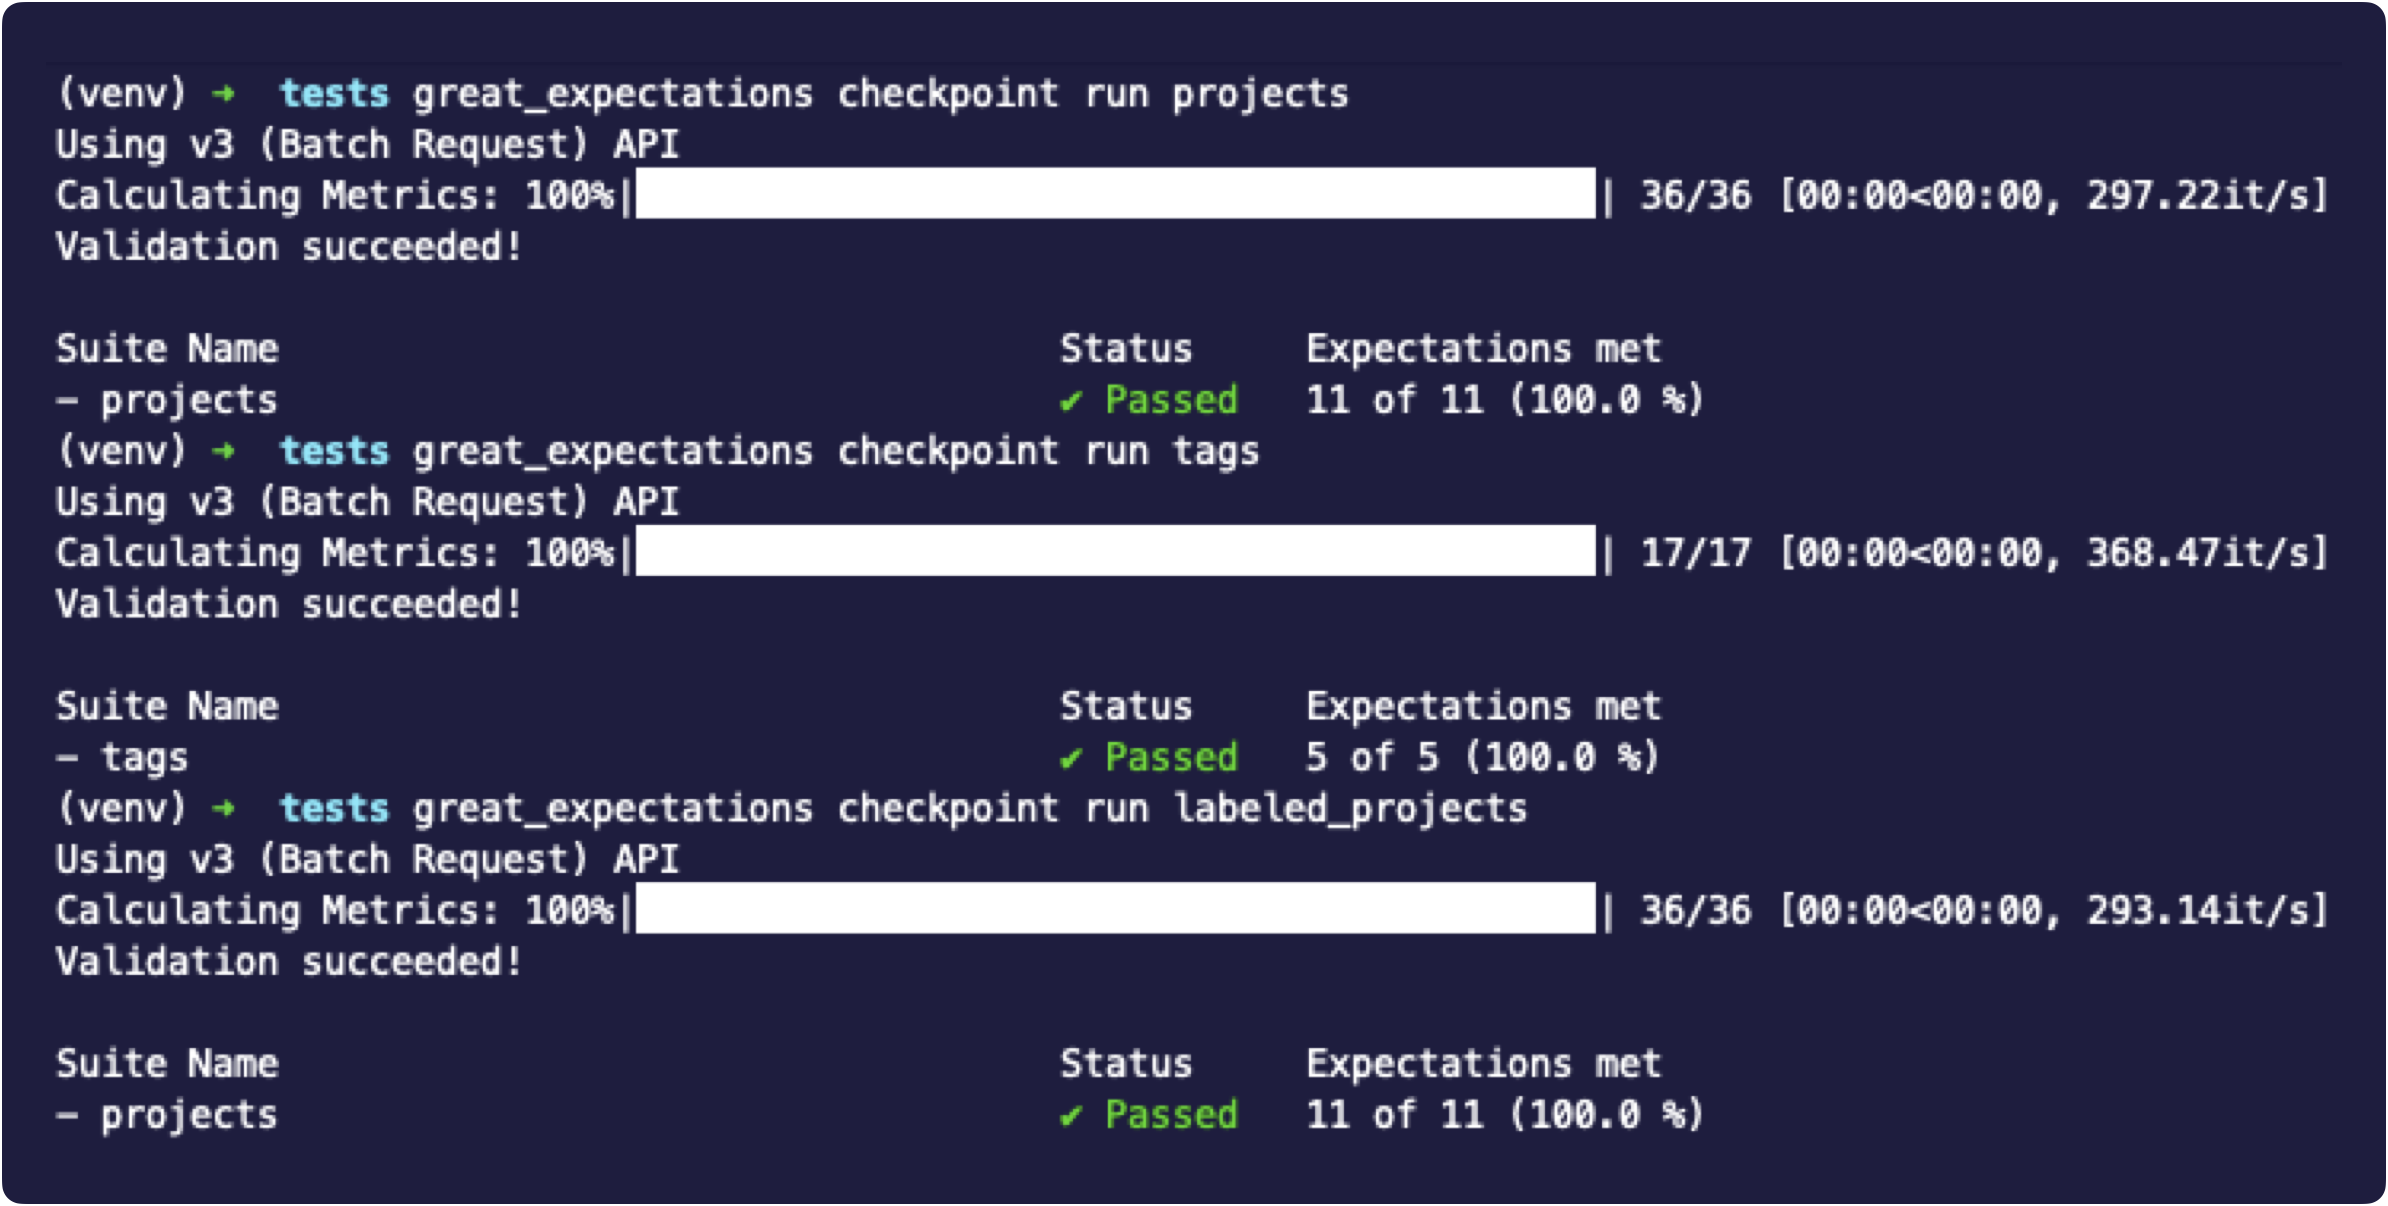
tags对和检查点重复这些相同的步骤,labeled_projects然后就可以执行它们了:
great_expectations checkpoint run projects
great_expectations checkpoint run tags
great_expectations checkpoint run labeled_projects
在本课结束时,将在transformers目标中创建一个Makefile运行所有这些测试(代码、数据和模型)的目标,并且将在transformers预提交课程中自动执行它们。
note
已经对transformers源数据集应用了预期,但还有许多其他关键领域需要测试数据。例如,清洗、扩充、拆分、预处理、标记化等过程的中间输出。
文档
当使用 CLI 应用程序创建期望时,Great Expectations 会自动为transformers测试生成文档。它还存储有关验证运行及其结果的信息。可以使用以下命令启动生成数据文档:great_expectations docs build
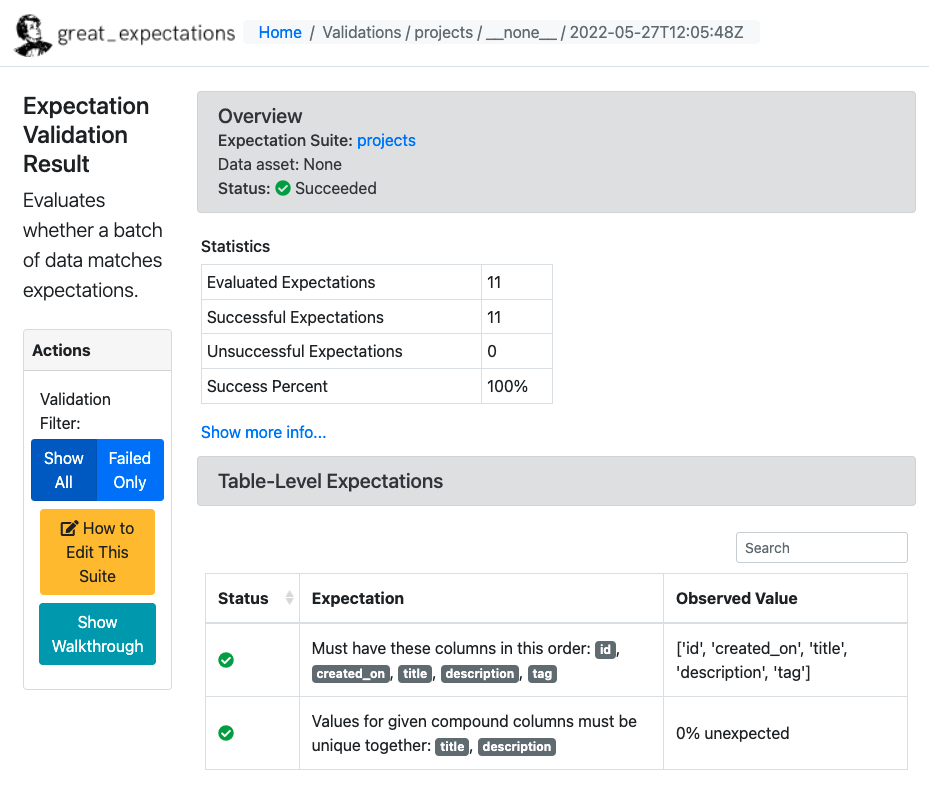
默认情况下,Great Expectations 在本地存储transformers期望、结果和指标,但对于生产,需要设置远程元数据存储。
生产
与孤立的 assert 语句相比,使用诸如 great expectations 之类的库的优势在于可以:
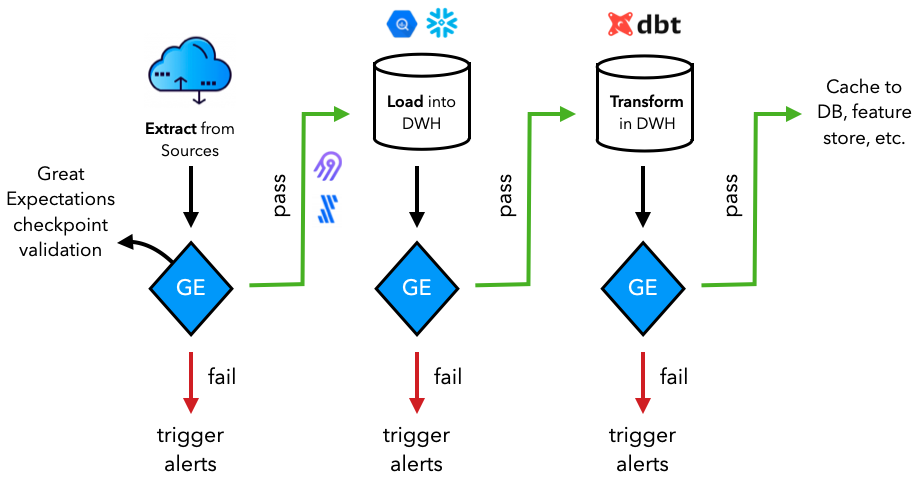
在transformersDataOps 工作流中提取、加载和转换数据时,将执行其中许多期望。通常,数据将从源(数据库、API等)中提取并加载到数据系统(例如数据仓库)中,然后在那里进行转换(例如使用dbt)以供下游应用程序使用。在这些任务中,可以运行 Great Expectations 检查点验证以确保数据的有效性和应用于数据的更改。将在编排课程中看到一个简化版本的数据验证何时应该在transformers数据工作流中进行。
如果您不熟悉不同的数据系统,请在transformers数据堆栈课程中了解更多信息。
model
测试 ML 系统的最后一个方面涉及在训练、评估、推理和部署期间测试模型。
训练
希望在开发训练管道时迭代地编写测试,以便可以快速发现错误。这一点尤为重要,因为与传统软件不同,ML 系统可以运行完成而不会引发任何异常/错误,但可能会产生不正确的系统。还希望快速捕获错误以节省时间和计算。
-
检查模型输出的形状和值
assert model(inputs).shape == torch.Size([len(inputs), num_classes]) -
在一批训练后检查损失是否减少
assert epoch_loss < prev_epoch_loss -
批量过拟合
accuracy = train(model, inputs=batches[0]) assert accuracy == pytest.approx(0.95, abs=0.05) # 0.95 ± 0.05 -
训练完成(测试提前停止、保存等)
train(model) assert learning_rate >= min_learning_rate assert artifacts -
在不同的设备上
assert train(model, device=torch.device("cpu"))
assert train(model, device=torch.device("cuda"))
note
您可以使用 pytest 标记标记计算密集型测试,并且仅在对影响模型的系统进行更改时才执行它们。
@pytest.mark.training
def test_train_model():
    ...
行为测试
行为测试是测试输入数据和预期输出的过程,同时将模型视为黑盒(与模型无关的评估)。它们不一定在本质上是对抗性的,但更多的是在部署模型后可能期望在现实世界中看到的扰动类型。关于这个主题的具有里程碑意义的论文是Beyond Accuracy: Behavioral Testing of NLP Models with CheckList,它将行为测试分为三种类型的测试:
-
invariance:更改不应影响输出。# INVariance via verb injection (changes should not affect outputs) tokens = ["revolutionized", "disrupted"] texts = [f"Transformers applied to NLP have {token} the ML field." for token in tokens] predict.predict(texts=texts, artifacts=artifacts)
['natural-language-processing', 'natural-language-processing']
-
directional:变化应该会影响产出。# DIRectional expectations (changes with known outputs) tokens = ["text classification", "image classification"] texts = [f"ML applied to {token}." for token in tokens] predict.predict(texts=texts, artifacts=artifacts)
['natural-language-processing', 'computer-vision']
-
minimum functionality:输入和预期输出的简单组合。# Minimum Functionality Tests (simple input/output pairs) tokens = ["natural language processing", "mlops"] texts = [f"{token} is the next big wave in machine learning." for token in tokens] predict.predict(texts=texts, artifacts=artifacts)
['natural-language-processing', 'mlops']
对抗性测试
这些类型的测试中的每一种还可以包括对抗性测试,例如使用常见的有偏见的令牌或嘈杂的令牌进行测试等。
texts = [
    "CNNs for text classification.",  # CNNs are typically seen in computer-vision projects
    "This should not produce any relevant topics."  # should predict `other` label
]
predict.predict(texts=texts, artifacts=artifacts)
可以将这些测试转换为系统的参数化测试:
mkdir tests/model
touch tests/model/test_behavioral.py
# tests/model/test_behavioral.py
from pathlib import Path
import pytest
from config import config
from tagifai import main, predict

@pytest.fixture(scope="module")
def artifacts():
    run_id = open(Path(config.CONFIG_DIR, "run_id.txt")).read()
    artifacts = main.load_artifacts(run_id=run_id)
    return artifacts

@pytest.mark.parametrize(
    "text_a, text_b, tag",
    [
        (
            "Transformers applied to NLP have revolutionized machine learning.",
            "Transformers applied to NLP have disrupted machine learning.",
            "natural-language-processing",
        ),
    ],
)
def test_inv(text_a, text_b, tag, artifacts):
    """INVariance via verb injection (changes should not affect outputs)."""
    tag_a = predict.predict(texts=[text_a], artifacts=artifacts)[0]["predicted_tag"]
    tag_b = predict.predict(texts=[text_b], artifacts=artifacts)[0]["predicted_tag"]
    assert tag_a == tag_b == tag
查看tests/model/test_behavioral.py
from pathlib import Path

import pytest

from config import config
from tagifai import main, predict


@pytest.fixture(scope="module")
def artifacts():
    run_id = open(Path(config.CONFIG_DIR, "run_id.txt")).read()
    artifacts = main.load_artifacts(run_id=run_id)
    return artifacts


@pytest.mark.parametrize(
    "text, tag",
    [
        (
            "Transformers applied to NLP have revolutionized machine learning.",
            "natural-language-processing",
        ),
        (
            "Transformers applied to NLP have disrupted machine learning.",
            "natural-language-processing",
        ),
    ],
)
def test_inv(text, tag, artifacts):
    """INVariance via verb injection (changes should not affect outputs)."""
    predicted_tag = predict.predict(texts=[text], artifacts=artifacts)[0]["predicted_tag"]
    assert tag == predicted_tag


@pytest.mark.parametrize(
    "text, tag",
    [
        (
            "ML applied to text classification.",
            "natural-language-processing",
        ),
        (
            "ML applied to image classification.",
            "computer-vision",
        ),
        (
            "CNNs for text classification.",
            "natural-language-processing",
        )
    ],
)
def test_dir(text, tag, artifacts):
    """DIRectional expectations (changes with known outputs)."""
    predicted_tag = predict.predict(texts=[text], artifacts=artifacts)[0]["predicted_tag"]
    assert tag == predicted_tag


@pytest.mark.parametrize(
    "text, tag",
    [
        (
            "Natural language processing is the next big wave in machine learning.",
            "natural-language-processing",
        ),
        (
            "MLOps is the next big wave in machine learning.",
            "mlops",
        ),
        (
            "This should not produce any relevant topics.",
            "other",
        ),
    ],
)
def test_mft(text, tag, artifacts):
    """Minimum Functionality Tests (simple input/output pairs)."""
    predicted_tag = predict.predict(texts=[text], artifacts=artifacts)[0]["predicted_tag"]
    assert tag == predicted_tag
推理
部署模型后,大多数用户将使用它进行推理(直接/间接),因此测试它的各个方面非常重要。
加载artifacts
这是第一次不从内存中加载组件,因此希望确保所需的工件(模型权重、编码器、配置等)都能够被加载。
artifacts = main.load_artifacts(run_id=run_id)
assert isinstance(artifacts["label_encoder"], data.LabelEncoder)
...
预言
一旦加载了工件,就准备好测试预测管道。应该只用一个输入和一批输入来测试样本(例如,填充有时会产生意想不到的后果)。
# test our API call directly
data = {
    "texts": [
        {"text": "Transfer learning with transformers for text classification."},
        {"text": "Generative adversarial networks in both PyTorch and TensorFlow."},
    ]
}
response = client.post("/predict", json=data)
assert response.status_code == HTTPStatus.OK
assert response.request.method == "POST"
assert len(response.json()["data"]["predictions"]) == len(data["texts"])
...
生成文件
让在其中创建一个目标,Makefile这将允许一次调用执行所有测试:
# Test
.PHONY: test
test:
    pytest -m "not training"
    cd tests && great_expectations checkpoint run projects
    cd tests && great_expectations checkpoint run tags
    cd tests && great_expectations checkpoint run labeled_projects
make test
测试与监控
最后,将讨论测试和监控之间的相似点和区别。它们都是 ML 开发管道的组成部分,并且相互依赖以进行迭代。测试可确保系统(代码、数据和模型)达到在离线时建立的预期。鉴于监控涉及这些期望继续在线传递实时生产数据,同时还通过以下方式确保其数据分布与参考窗口(通常是训练数据的子集)具有可比性吨n. 当这些条件不再成立时,需要更仔细地检查(再培训可能并不总能解决根本问题)。
对于监控,在测试期间不必考虑很多不同的问题,因为它涉及尚未看到的(实时)数据。
- 特征和预测分布(漂移)、类型、模式不匹配等。
- 使用间接信号(因为标签可能不容易获得)确定模型性能(整体和数据切片的滚动和窗口度量)。
- 在大数据的情况下,需要知道要标记哪些数据点并进行上采样以进行训练。
- 识别异常和异常值。
将在监控课程中更深入地(和代码)介绍所有这些概念。
资源
- Great Expectations
- The ML Test Score: A Rubric for ML Production Readiness and Technical Debt Reduction
- Beyond Accuracy: Behavioral Testing of NLP Models with CheckList
- Robustness Gym: Unifying the NLP Evaluation Landscape
更多干货,第一时间更新在以下微信公众号:

您的一点点支持,是我后续更多的创造和贡献

转载到请包括本文地址 更详细的转载事宜请参考文章如何转载/引用
本文主体源自以下链接:
@article{madewithml,
    author       = {Goku Mohandas},
    title        = { Made With ML },
    howpublished = {\url{https://madewithml.com/}},
    year         = {2022}
}