管理和跟踪机器学习实验。
Intuition
到目前为止,一直在训练和评估不同的基线,但还没有真正跟踪这些实验。将解决这个问题,但定义一个适当的实验跟踪过程,将用于所有未来的实验(包括超参数优化)。实验跟踪是管理所有不同实验及其组件(例如参数、指标、模型和其他工件)的过程,它使能够:
- 组织特定实验的所有必要组件。重要的是把所有东西都放在一个地方并且知道它在哪里,这样你以后可以使用它们。
- 使用保存的实验(轻松)重现过去的结果。
- 记录跨时间、数据、想法、团队等的迭代改进。
实验跟踪有很多选项,但将使用MLFlow(100% 免费和开源),因为它具有需要的所有功能(以及不断增长的集成支持)。可以在自己的服务器和数据库上运行 MLFlow,因此没有存储成本/限制,使其成为最受欢迎的选项之一,并被 Microsoft、Facebook、Databricks 和其他公司使用。您还可以设置自己的跟踪服务器,以在多个团队成员之间同步运行同一任务。
还有几个流行的选项,例如Comet ML(被 Google AI、HuggingFace 等使用)、Neptune(被 Roche、NewYorker 等使用)、Weights and Biases (被 Open AI、Toyota Research 等使用) . 这些都是很棒的工具,提供仪表板、无缝集成、超参数搜索、报告甚至调试等功能!
许多平台正在利用其作为实验数据源的地位来提供扩展到 ML 开发管道其他部分的功能,例如版本控制、调试、监控等。
应用
将从初始化实验所需的所有参数开始。
pip install mlflow==1.23.1 -q
from argparse import Namespace
import mlflow
from pathlib import Path
输入参数args包含所有需要的参数,很高兴将它们全部组织在一个变量下,这样就可以轻松地记录它并为不同的实验调整它(会在进行超参数优化时看到这一点)。
# Specify arguments
args = Namespace(
    lower=True,
    stem=False,
    analyzer="char",
    ngram_max_range=7,
    alpha=1e-4,
    learning_rate=1e-1,
    power_t=0.1,
    num_epochs=100
)
接下来,将设置模型注册表,其中将存储所有实验及其各自的运行。还将使用特定的运行 ID 从此注册表中加载经过训练的模型。
# Set tracking URI
MODEL_REGISTRY = Path("experiments")
Path(MODEL_REGISTRY).mkdir(exist_ok=True) # create experiments dir
mlflow.set_tracking_uri("file://" + str(MODEL_REGISTRY.absolute()))
Tip
在 Windows 上,设置跟踪 URI 的最后一行应该有三个正斜杠:
mlflow.set_tracking_uri("file:///" + str(MODEL_REGISTRY.absolute()))
当与其他团队成员合作时,这个模型注册表将存在于云端。团队的成员可以连接到它(通过身份验证)以保存和加载经过训练的模型。如果您不想设置和维护模型注册表,这就是Comet ML、Weights and Biases和其他平台等平台卸载大量技术设置的地方。
训练
为了简单起见,将所有用于训练的组件封装到一个函数中,该函数返回希望能够从实验中跟踪的所有工件。
现在忽略该
trial参数(默认为None),因为它将在超参数优化课程中用于修剪没有希望的试验。
def train(args, df, trial=None):
    """Train model on data."""

    # Setup
    set_seeds()
    df = pd.read_csv("labeled_projects.csv")
    df = df.sample(frac=1).reset_index(drop=True)
    df = preprocess(df, lower=True, stem=False, min_freq=min_freq)
    label_encoder = LabelEncoder().fit(df.tag)
    X_train, X_val, X_test, y_train, y_val, y_test = \
        get_data_splits(X=df.text.to_numpy(), y=label_encoder.encode(df.tag))

    # Tf-idf
    vectorizer = TfidfVectorizer(analyzer=args.analyzer, ngram_range=(2,args.ngram_max_range))  # char n-grams
    X_train = vectorizer.fit_transform(X_train)
    X_val = vectorizer.transform(X_val)
    X_test = vectorizer.transform(X_test)

    # Oversample
    oversample = RandomOverSampler(sampling_strategy="all")
    X_over, y_over = oversample.fit_resample(X_train, y_train)

    # Model
    model = SGDClassifier(
        loss="log", penalty="l2", alpha=args.alpha, max_iter=1,
        learning_rate="constant", eta0=args.learning_rate, power_t=args.power_t,
        warm_start=True)

    # Training
    for epoch in range(args.num_epochs):
        model.fit(X_over, y_over)
        train_loss = log_loss(y_train, model.predict_proba(X_train))
        val_loss = log_loss(y_val, model.predict_proba(X_val))
        if not epoch%10:
            print(
                f"Epoch: {epoch:02d} | "
                f"train_loss: {train_loss:.5f}, "
                f"val_loss: {val_loss:.5f}"
            )

        # Log
        if not trial:
            mlflow.log_metrics({"train_loss": train_loss, "val_loss": val_loss}, step=epoch)

        # Pruning (for optimization in next section)
        if trial:
            trial.report(val_loss, epoch)
            if trial.should_prune():
                raise optuna.TrialPruned()

    # Threshold
    y_pred = model.predict(X_val)
    y_prob = model.predict_proba(X_val)
    args.threshold = np.quantile(
        [y_prob[i][j] for i, j in enumerate(y_pred)], q=0.25)  # Q1

    # Evaluation
    other_index = label_encoder.class_to_index["other"]
    y_prob = model.predict_proba(X_test)
    y_pred = custom_predict(y_prob=y_prob, threshold=args.threshold, index=other_index)
    metrics = precision_recall_fscore_support(y_test, y_pred, average="weighted")
    performance = {"precision": metrics[0], "recall": metrics[1], "f1": metrics[2]}
    print (json.dumps(performance, indent=2))

    return {
        "args": args,
        "label_encoder": label_encoder,
        "vectorizer": vectorizer,
        "model": model,
        "performance": performance
    }
追踪
使用 MLFlow 需要首先初始化一个实验,然后你可以在该实验下运行。
import joblib
import tempfile
# Set experiment
mlflow.set_experiment(experiment_name="baselines")
INFO: ‘baselines’ does not exist. Creating a new experiment
def save_dict(d, filepath):
    """Save dict to a json file."""
    with open(filepath, "w") as fp:
        json.dump(d, indent=2, sort_keys=False, fp=fp)
# Tracking
with mlflow.start_run(run_name="sgd"):

    # Train & evaluate
    artifacts = train(args=args, df=df)

    # Log key metrics
    mlflow.log_metrics({"precision": artifacts["performance"]["precision"]})
    mlflow.log_metrics({"recall": artifacts["performance"]["recall"]})
    mlflow.log_metrics({"f1": artifacts["performance"]["f1"]})

    # Log artifacts
    with tempfile.TemporaryDirectory() as dp:
        artifacts["label_encoder"].save(Path(dp, "label_encoder.json"))
        joblib.dump(artifacts["vectorizer"], Path(dp, "vectorizer.pkl"))
        joblib.dump(artifacts["model"], Path(dp, "model.pkl"))
        save_dict(artifacts["performance"], Path(dp, "performance.json"))
        mlflow.log_artifacts(dp)

    # Log parameters
    mlflow.log_params(vars(artifacts["args"]))
Epoch: 00 | train_loss: 1.16930, val_loss: 1.21451 Epoch: 10 | train_loss: 0.46116, val_loss: 0.65903 Epoch: 20 | train_loss: 0.31565, val_loss: 0.56018 Epoch: 30 | train_loss: 0.25207, val_loss: 0.51967 Epoch: 40 | train_loss: 0.21740, val_loss: 0.49822 Epoch: 50 | train_loss: 0.19615, val_loss: 0.48529 Epoch: 60 | train_loss: 0.18249, val_loss: 0.47708 Epoch: 70 | train_loss: 0.17330, val_loss: 0.47158 Epoch: 80 | train_loss: 0.16671, val_loss: 0.46765 Epoch: 90 | train_loss: 0.16197, val_loss: 0.46488 { “precision”: 0.8929962902778195, “recall”: 0.8333333333333334, “f1”: 0.8485049088497365 }
查看
让看看从实验中追踪到的内容。MLFlow 为提供了一个仪表板,供在本地主机端口上查看和探索实验。如果您在本地计算机上运行它,您可以简单地运行 MLFlow 服务器:
mlflow server -h 0.0.0.0 -p 8000 --backend-store-uri $PWD/experiments/
并打开http://localhost:8000/以查看仪表板。但是,如果您使用的是 Google colab,将使用 localtunnel在该note本和公共 URL 之间创建连接。
如果未安装 localtunnel,您可能需要先
!npm install -g localtunnel在单元格中运行。
# Run MLFlow server and localtunnel
get_ipython().system_raw("mlflow server -h 0.0.0.0 -p 8000 --backend-store-uri $PWD/experiments/ &")
!npx localtunnel --port 8000
MLFlow 创建一个包含所有实验及其各自运行的主仪表板。可以通过单击列标题对运行进行排序。
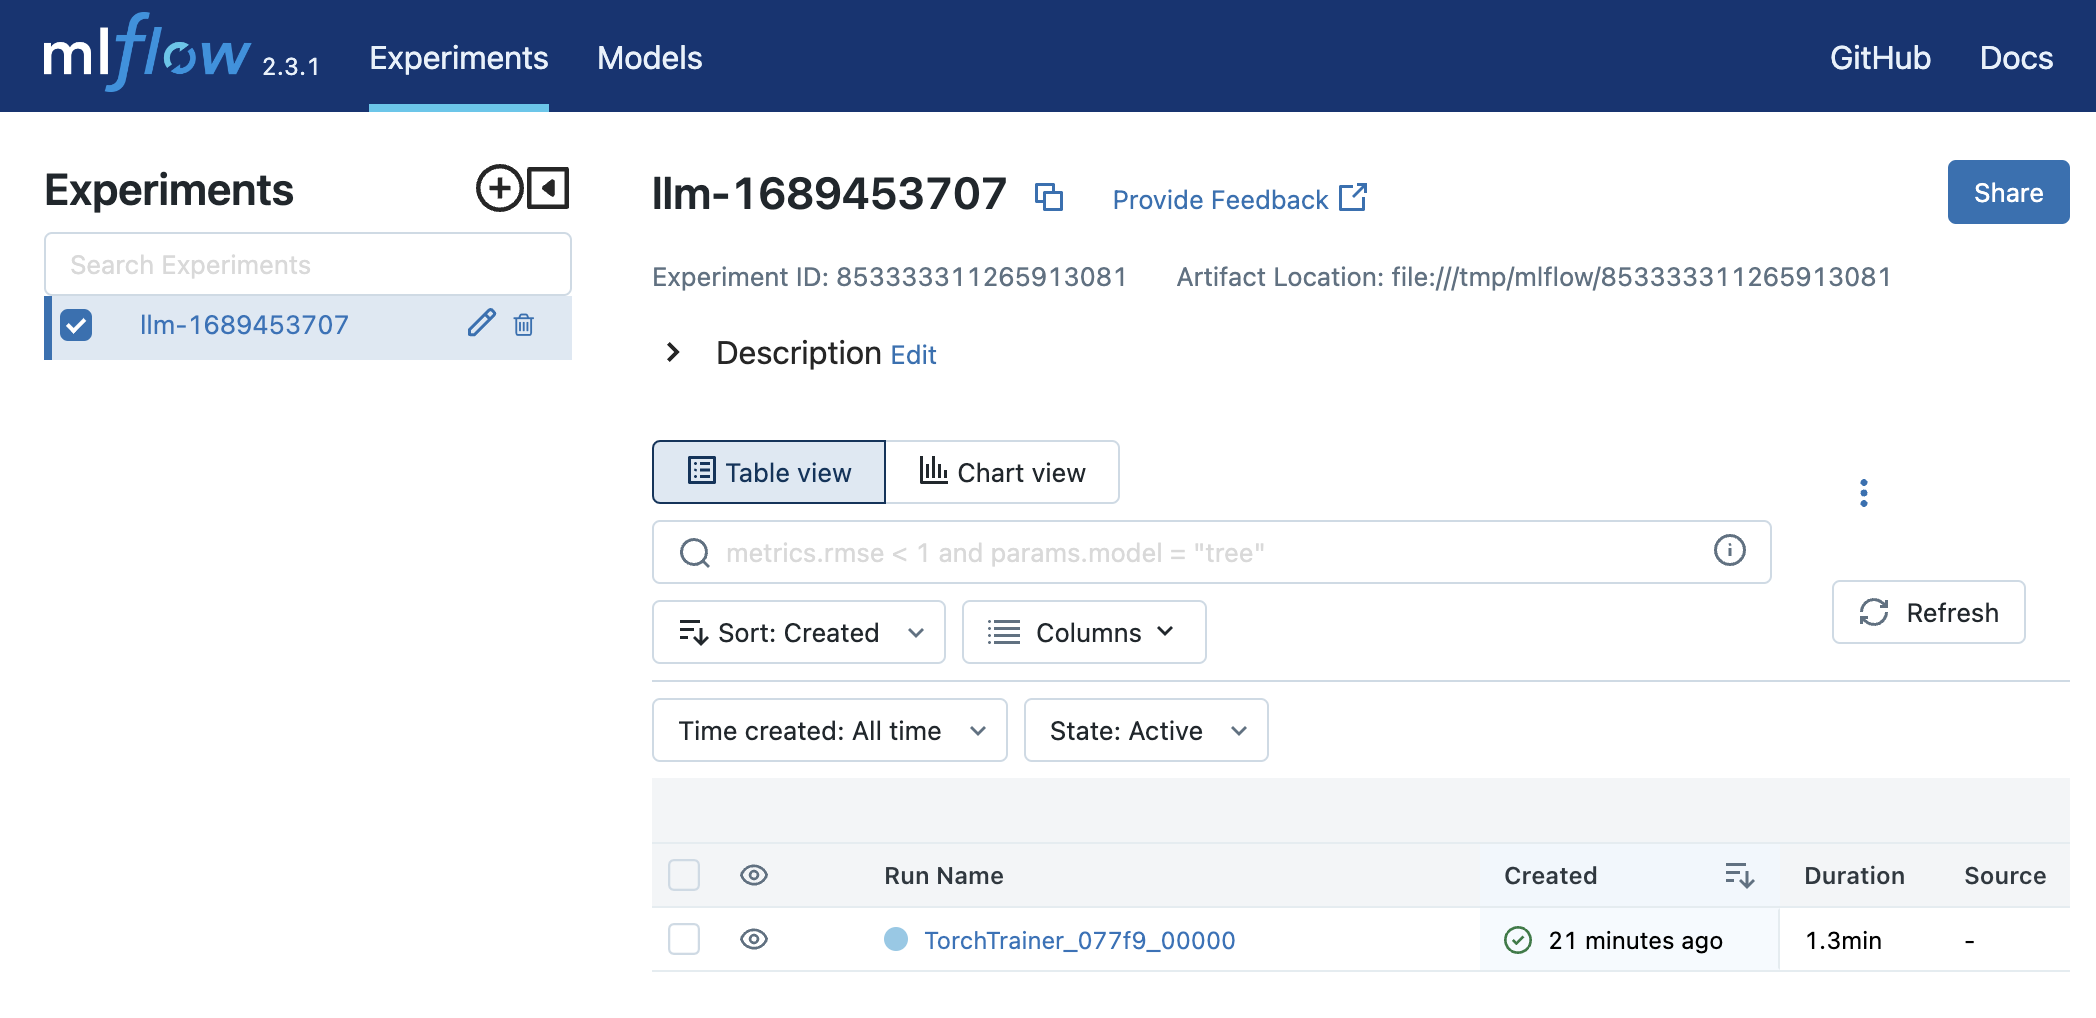
可以在主仪表板上单击任何实验以进一步探索它(单击每次运行的时间戳链接)。然后单击左侧的指标以在图中查看它们:

加载中
需要能够加载保存的实验工件以进行推理、再训练等。
def load_dict(filepath):
    """Load a dict from a json file."""
    with open(filepath, "r") as fp:
        d = json.load(fp)
    return d
# Load all runs from experiment
experiment_id = mlflow.get_experiment_by_name("baselines").experiment_id
all_runs = mlflow.search_runs(experiment_ids=experiment_id, order_by=["metrics.val_loss ASC"])
print (all_runs)
# Best run
best_run_id = all_runs.iloc[0].run_id
best_run = mlflow.get_run(run_id=best_run_id)
client = mlflow.tracking.MlflowClient()
with tempfile.TemporaryDirectory() as dp:
    client.download_artifacts(run_id=best_run_id, path="", dst_path=dp)
    vectorizer = joblib.load(Path(dp, "vectorizer.pkl"))
    label_encoder = LabelEncoder.load(fp=Path(dp, "label_encoder.json"))
    model = joblib.load(Path(dp, "model.pkl"))
    performance = load_dict(filepath=Path(dp, "performance.json"))
print (json.dumps(performance, indent=2))
{ “precision”: 0.8929962902778195, “recall”: 0.8333333333333334, “f1”: 0.8485049088497365 }
# Inference
text = "Transfer learning with transformers for text classification."
predict_tag(texts=[text])
[‘natural-language-processing’]
Tip
还可以通过使用它的运行 ID 直接从模型注册表加载特定运行的模型工件,而无需将它们保存到临时目录。
artifact_uri = mlflow.get_run(run_id=run_id).info.artifact_uri.split("file://")[-1]
params = Namespace(**utils.load_dict(filepath=Path(artifact_uri, "args.json")))
label_encoder = data.MultiLabelLabelEncoder.load(fp=Path(artifact_uri, "label_encoder.json"))
tokenizer = data.Tokenizer.load(fp=Path(artifact_uri, "tokenizer.json"))
model_state = torch.load(Path(artifact_uri, "model.pt"), map_location=device)
performance = utils.load_dict(filepath=Path(artifact_uri, "performance.json"))
更多干货,第一时间更新在以下微信公众号:

您的一点点支持,是我后续更多的创造和贡献

转载到请包括本文地址 更详细的转载事宜请参考文章如何转载/引用
本文主体源自以下链接:
@article{madewithml,
    author       = {Goku Mohandas},
    title        = { Made With ML },
    howpublished = {\url{https://madewithml.com/}},
    year         = {2022}
}