DeepSeek R1复现指导手册
1、DeepSeek R1 蒸馏指导
参考工程:https://github.com/huggingface/open-r1
1.1、DeepSeek R1蒸馏原理
蒸馏是一种机器学习技术,其中较小的模型(“学生”)经过训练以模仿较大的预训练模型(“老师”)的行为。目标是保留老师的大部分表现,同时显著降低计算成本和内存占用。
DeepSeek R1 SFT蒸馏小模型的本质:将【DeepSeek R1大模型的推理轨迹】转移给小模型
具体过程:
-
蒸馏数据准备
- 准备数据集,包含“问题+答案”。
::: 问题:
Return your final response within \boxed{}. The operation ⊗ is defined for all nonzero numbers by a⊗b=a2b. Determine [(1⊗2)⊗3]−[1⊗(2⊗3)].\n(A) −23(B) −14(C) 0(D) 14(E) 23
答案:
Thus, the answer is \(\boxed{A}\) :::
- 让DeepSeek R1模型回答数据集的“问题”,得到“思考过程+答案”。prompt示例如下:
::: Your role as an assistant involves thoroughly exploring questions through a systematic long thinking process before providing the final precise and accurate solutions. This requires engaging in a comprehensive cycle of analysis, summarizing, exploration, reassessment, reflection, backtracing, and iteration to develop well-considered thinking process. Please structure your response into two main sections: Thought and Solution. In the Thought section, detail your reasoning process using the specified format: <|begin_of_thought|> {thought with steps separated with ’\n\n’} <|end_of_thought|> Each step should include detailed considerations such as analisying questions, summarizing relevant findings, brainstorming new ideas, verifying the accuracy of the current steps, refining any errors, and revisiting previous steps. In the Solution section, based on various attempts, explorations, and reflections from the Thought section, systematically present the final solution that you deem correct. The solution should remain a logical, accurate, concise expression style and detail necessary step needed to reach the conclusion, formatted as follows: <|begin_of_solution|> {final formatted, precise, and clear solution} <|end_of_solution|> Now, try to solve the following question through the above guidelines: :::
- 用人工或者模型对以上数据集做筛选,去掉思考过程不合理或者答案不对的数据。获得可用于蒸馏的数据集,其中每一条数据包含“问题+思考过程+答案”。
用于蒸馏的数据示例:
::: 问题:
Return your final response within \boxed{}. The operation ⊗ is defined for all nonzero numbers by a⊗b=a2b. Determine [(1⊗2)⊗3]−[1⊗(2⊗3)].\n(A) −23(B) −14(C) 0(D) 14(E) 23
思考过程:
| < | begin_of_thought | >\n\nOkay, let me try to figure out this problem. So, we have this operation defined as a⊗b = a²/b. And we need to compute [(1⊗2)⊗3] - [1⊗(2⊗3)]. Then choose the correct answer from the options given. Alright, let’s break it down step by step.\n\nFirst, I need to remember that the operation ⊗ is not associative, right? Because the problem is asking for the difference between two different groupings: (1⊗2)⊗3 and 1⊗(2⊗3). So, the order in which we perform the operations matters here. That’s probably why there’s a subtraction between them.\n\nLet me start by computing each part separately. Let’s tackle the first part: (1⊗2)⊗3.\n\nStarting with the innermost operation, which is 1⊗2. According to the definition, a⊗b = a²/b. So here, a is 1 and b is 2. Plugging those in: 1² / 2 = 1/2. So, 1⊗2 equals 1/2.\n\nNow, we take that result and perform the next operation with 3. So, (1⊗2)⊗3 becomes (1/2)⊗3. Again, using the same definition: a is now 1/2 and b is 3. So, ( (1/2)² ) / 3 = (1/4) / 3 = 1/12. So, (1⊗2)⊗3 equals 1/12.\n\nAlright, that’s the first part. Now let’s compute the second part: 1⊗(2⊗3). Again, starting with the innermost operation, which is 2⊗3. Applying the definition: a is 2 and b is 3. So, 2² / 3 = 4/3. Therefore, 2⊗3 equals 4/3.\n\nNow, we need to compute 1⊗(4/3). Here, a is 1 and b is 4/3. Using the operation definition: 1² / (4/3) = 1 / (4/3) = 3/4. So, 1⊗(2⊗3) equals 3/4.\n\nNow, the problem asks for the difference between the two results: [(1⊗2)⊗3] - [1⊗(2⊗3)] = (1/12) - (3/4). To subtract these fractions, they need a common denominator. The denominators are 12 and 4, so 12 is the common denominator.\n\nConverting 3/4 to twelfths: 3/4 = 9/12. So, 1/12 - 9/12 = (1 - 9)/12 = -8/12. Simplifying that fraction by dividing numerator and denominator by 4: -8/12 = -2/3.\n\nHmm, looking at the answer choices, option A is -2/3. So, is that the answer? Wait, but let me double-check my calculations to make sure I didn’t make a mistake somewhere.\n\nFirst, checking (1⊗2): 1² / 2 = 1/2. Correct. Then, (1/2)⊗3: (1/2)² / 3 = (1/4)/3 = 1/12. That seems right.\n\nNow, for 2⊗3: 2² / 3 = 4/3. Correct. Then, 1⊗(4/3): 1² / (4/3) = 1 / (4/3) = 3/4. Yes, that’s correct.\n\nSubtracting 3/4 from 1/12: 1/12 - 3/4. Convert 3/4 to 9/12, so 1/12 - 9/12 = -8/12 = -2/3. Yes, that all checks out. So the answer should be -2/3, which is option A.\n\nWait, but let me think again. The operation is defined for all nonzero numbers, so we don’t have any issues with division by zero here. 2⊗3 is 4/3, which is fine, and then 1⊗(4/3) is 3/4. Correct.\n\nAlternatively, maybe there’s a different way to approach the problem? Let me try expanding both expressions using variables to see if there’s a pattern.\n\nLet’s denote the first expression: (a⊗b)⊗c. Using the definition:\n\nFirst, compute a⊗b = a²/b.\n\nThen, take that result and ⊗ with c: (a²/b)⊗c = ( (a²/b)² ) / c = a⁴ / (b² c).\n\nNow, the second expression: a⊗(b⊗c). First compute b⊗c = b²/c.\n\nThen, a⊗(b²/c) = a² / (b²/c) = a² * (c / b²) = (a² c) / b².\n\nTherefore, the difference between the two expressions is:\n\n(a⁴ / (b² c)) - (a² c / b²) = (a⁴ - a² c²) / (b² c) = a² (a² - c²) / (b² c).\n\nHmm, factoring that, it’s a² (a - c)(a + c) / (b² c).\n\nBut in our specific problem, a = 1, b = 2, c = 3. Plugging those values in:\n\n1² (1 - 3)(1 + 3) / (2² * 3) = 1 * (-2)(4) / (4 * 3) = (-8) / 12 = -2/3. Same result. So that confirms the answer is indeed -2/3.\n\nTherefore, I think my initial calculation was correct, and the answer is option A.\n\n**Final Answer**\n\boxed{A}\n\n< | end_of_thought | >\n\n< | begin_of_solution | >\n\nTo determine the value of \([(1 \otimes 2) \otimes 3] - [1 \otimes (2 \otimes 3)]\) where the operation \(\otimes\) is defined by \(a \otimes b = \frac{a^2}{b}\), we proceed as follows:\n\nFirst, compute \(1 \otimes 2\):\n\n1⊗2=122=12\n \nNext, use this result to compute \((1 \otimes 2) \otimes 3\):\n\n(12)⊗3=(12)23=143=112\n \n\nNow, compute \(2 \otimes 3\):\n\n2⊗3=223=43\n \nThen, use this result to compute \(1 \otimes (2 \otimes 3)\):\n\n1⊗(43)=1243=143=34\n \n\nFinally, find the difference between the two results:\n\n112−34=112−912=1−912=−812=−23\n \n\n |
答案:
Thus, the answer is \(\boxed{A}\) :::
-
模型微调
- 选择基座模型,选择合适框架,如open_r1,用以上整理得到的蒸馏数据对基座模型进行微调
-
微调结果测试
- 用测试集和测试脚本来进行模型效果测试
本教程只包含第2步模型微调部分和第3步测试部分。
-
蒸馏数据为社区已经整理好的Bespoke-Stratos-17k
- 原始Berkeley Sky-T1数据集让DeepSeek R1填充思考过程,再经过筛选得到Bespoke-Stratos-17k。
-
基座模型选用Qwen2.5-Math-1.5B。
-
测试集选用aime_2024,MATH-500和gpqa。
1.2、蒸馏过程
基础环境要求
-
硬件配置:8xC500 (也适用沐曦同系列产品C550)
-
操作系统:Ubuntu 20.04.3 LTS
-
软件版本:maca 2.29.0.3
数据和模型下载
mkdir ~/openr1_datas
下载基础模型:git clone https://www.modelscope.cn/Qwen/Qwen2.5-Math-1.5B.git
下载蒸馏数据:git clone https://www.modelscope.cn/datasets/HuggingFaceH4/Bespoke-Stratos-17k.git
下载测试集:
git clone https://www.modelscope.cn/datasets/HuggingFaceH4/aime_2024.git
git clone https://www.modelscope.cn/datasets/HuggingFaceH4/MATH-500.git
git clone https://www.modelscope.cn/datasets/modelscope/gpqa.git
为方便起见,我们已在10.0179.28机器上下载好,路径为/mnt/nvme0n1p1/R1_images_release/openr1_datas
1、加载镜像
docker load -i /mnt/nvme0n1p1/R1_images_release/openr1_sft:maca229:v0.1.tar
2、利用镜像创建容器,注意要把下载了模型和数据的路径映射进去
docker run -it --device=/dev/dri --device=/dev/mxcd --group-add video --name openr1_sft --shm-size '100gb' -v /openr1_datas:/mnt/nvme0n1p1/R1_images_release/openr1_datas openr1_sft:v0.1 /bin/bash
3、训练过程
cd /open-r1
bash train.sh
训练一个epoch时间估计在30min左右
输出以下日志表示正常进入训练流程

4、测试过程
bash eval.sh
输出示例:


全套测试时间估计在20min左右。如上图就表示三个数据集的pass@1指标分别是6.67/45.5/28.79。
1.3、蒸馏结果
1.3.1、测试集说明
| 测试集 | 测试集说明 |
|---|---|
| aime24 | 美国数学竞赛题30题 |
| math_500 | 数学题500题 |
| gpqa:diamond | 生物化学物理题198题 |
1.3.2、预期测试结果

| 测试结果(%) | Qwen2.5-Math-1.5B | Qwen2.5-1.5B-Open-R1-Distill | Qwen2.5-Math-1.5B_ours_1epoch |
|---|---|---|---|
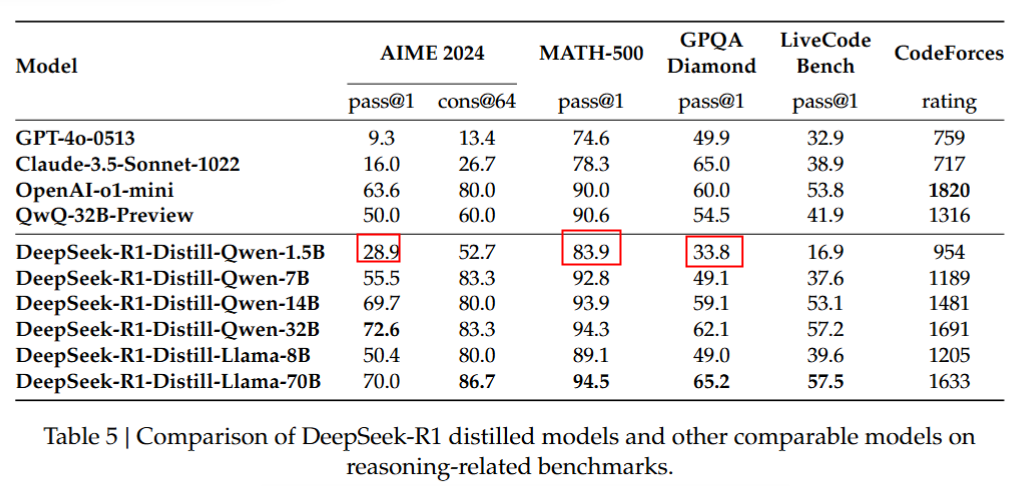
| aime_2024 | 3.33 | 30(paper28.9) | 6.67 |
| MATH-500 | 23.6 | 83(paper 83.9) | 45.4 |
| GPQA Diamond | 25.75 | 32.83(paper 33.8) | 28.79 |
-
Qwen2.5-Math-1.5B列表示蒸馏前模型的效果
-
Qwen2.5-1.5B-Open-R1-Distill:是下载的官方给出的80万数据蒸馏出的模型DeepSeek-R1-Distill-Qwen-1.5B(https://www.modelscope.cn/models/deepseek-ai/DeepSeek-R1-Distill-Qwen-1.5B),这里记录模型在当前的测试脚本里测试的结果,括号里的paper是该模型在文章里的测试结果,会有一定随机性。此列表明测试脚本的正确性。
-
Qwen2.5-Math-1.5B_ours_1epoch:表示训练到1个epoch的效果
可以观察到,Qwen模型经过1个epoch蒸馏后,在推理测试集上的效果明显好于蒸馏前,即模型获得了更强的推理能力。
1.3.3、蒸馏总结
得益于DeepSeekR1的思考过程数据,蒸馏后的Qwen模型相比于蒸馏前模型,在推理测试集上效果提升明显。受限于训练轮数和训练数据,还未能完全到达论文中的效果,后续有很大优化空间。
此文档仅作为方法指导,数据集和基座模型可按照需要进行替换。e
2、DeepSeek R1 强化学习指导
2.1、项目操作手册
- ++数据和模型准备++
本项目的训练任务为利用给定的几个数字数字使用”+-x÷”计算得到目标数字,类似于计算 24 点。使用的 base 模型为 Qwen2.5-1.5B-Instruct
-
数据集下载链接:https://huggingface.co/datasets/Jiayi-Pan/Countdown-Tasks-3to4
-
base 模型下载链接:https://www.modelscope.cn/models/Qwen/Qwen2.5-1.5B-Instruct/
-
加载镜像
docker load -i /mnt/nvme0n1p1/R1_images_release/mini-deepseek-r1-image.tar
- 基于镜像启动容器,并挂载数据和模型所在的路径
docker run -d -it --device=/dev/infiniband --device=/dev/dri --device=/dev/mxcd --group-add video --network=host --security-opt seccomp=unconfined --security-opt apparmor=unconfined --shm-size 100gb --ulimit memlock=-1 --name mini-r1 -v /mnt:/mnt mini-deepseek-r1:v0.1 /bin/bash
-
启动训练脚本
-
进入工作目录:cd /workspace/mini-deepseek-r1
-
修改数据集和模型路径:打开文件 grpo-vllm.yaml 将下面两个字段分别改成当前容器中的模型的路径和数据集路径
-

- 启动训练脚本
bash train.sh 2>&1 | tee log.txt
注:
-
训练 450 个 step 的时间约为 1 个小时
-
训练完成后保存的模型会在./runs/qwen-2.5-1.5b-r1-countdown 文件夹中,也可修改 grpo-vllm.yaml 中的”output_dir”字段来修改保存的训练结果的路径
- 训练后的模型进行测试
打开 inference.py 将下面字段替换成测试模型的路径即可

注:测试数据只取了Countdown-Tasks-3to4中的最后 500 条
2.2、强化学习训练结果
2.2.1、数据说明
本文使用的数据是在Countdown-Tasks-3to4中选取前 50000 条,然后在选取最后 500 条作为测试数据。
2.2.2、测试结果
| 模型 | 测试集准确率 |
|---|---|
| Qwen2.5-1.5B-Instruct | 8/500 |
| Qwen2.5-1.5B-r1(450 step) | 59/500 |
说明:
-
Qwen2.5-1.5B-r1(450 step)表示经过 450 个 step 的强化学习训练后得到的模型。
-
本次训练总共 450 个 step,使用 8 张 C500, 总耗时约 1 小时
2.2.3、强化学习结论
经过强化学习后的模型效果明显优于原 base 模型。优于训练的 step 过少,且 1.5B 模型原始的推理能力有限,后续还有很大优化空间。
R1-V复现指导
1. 前言
本手册旨在帮助开发人员在沐曦硬件平台上正常运行R1-V项目。本手册主要适用人员需要具备以下基本能力:
-
基本计算机知识、算法的开发人员,需要具备熟练试用操作系统,包括文件管理、命令行操作等;
-
能使用git进行版本控制,包括项目克隆(clone)和拉取(pull);
-
具备基本深度学习知识和代码开发能力,主要是torch、deepspeed等深度学习开发库和python语言开发能力;
-
能使用docker完成常规容器使用、创建、管理。
本手册提供详细安装步骤和提供一键启动安装(章节5)两种方式供开发者使用。
2. 环境准备
2.1 基础环境要求
硬件配置:8xC500 (也适用沐曦同系列产品C550)
操作系统:Ubuntu 20.04.3 LTS
软件版本:maca 2.29.0.3
2.2 python虚拟环境安装
2.2.1 下载Anaconda:
wget https://mirrors.tuna.tsinghua.edu.cn/anaconda/archive/Anaconda3-2023.03-Linux-x86_64.sh
或者在以下网址手动下载:
https://mirrors.tuna.tsinghua.edu.cn/anaconda/archive/?C=M&O=D
2.2.2 运行安装脚本:
给予安装脚本执行权限:
chmod +x Anaconda3-2023.03-Linux-x86_64.sh
运行安装脚本:
./Anaconda3-2023.03-Linux-x86_64.sh
2.2.3 安装过程中提示操作:
阅读许可协议,输入 yes 表示同意;
选择安装路径(建议使用默认路径,避免路径中包含中文或空格);
提示是否初始化 conda 时,输入 yes,以便 conda 在启动时自动设置路径。
3. 项目安装
3.1 R1-V项目克隆
打开终端,输入以下命令:
git clone https://github.com/Deep-Agent/R1-V.git
3.2 相关安装包准备
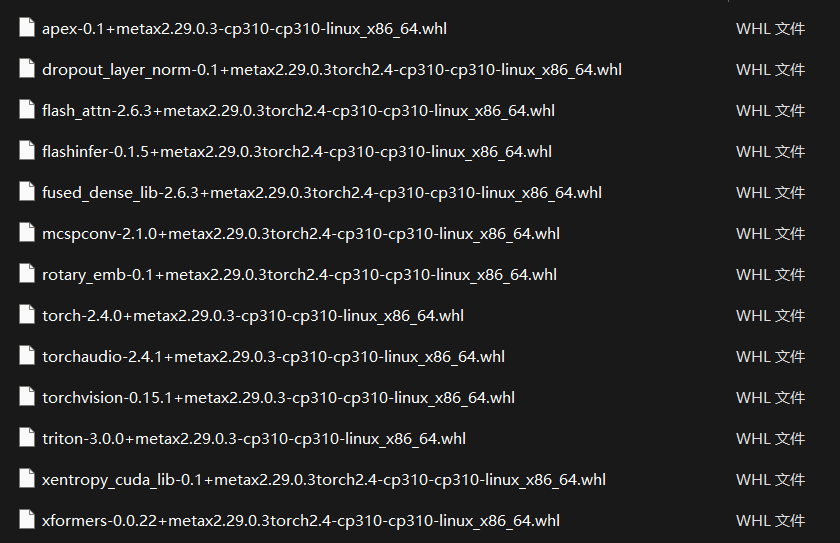
在项目安装过程中会安装一些引用库,但是这些引用库在C500硬件上无法运行,所以需要单独安装,以下安装包需要单独安装,下载地址,下载压缩文件的wheel文件夹包含所需安装的库文件,如图所示。

*安装包版本可能与下载文件不同
3.3 环境构建
3.3.1 docker准备
在公司harbor网站下载指定镜像,在网站中选择ai-release/C500/deepspeed目录下tags=2.23.0.1-py310-ubuntu20.04-amd64镜像。
3.3.2 载入镜像
docker load -i /path/to/image.tar
3.3.3 容器的实例化
按照以下命令将指定的镜像id(<image_id>参数)实例化为指定名字的容器(–name 参数),需要映射的路径根据自己需要进行调整(<-v>参数)。
docker run -itd --net=host --uts=host --ipc=host --device=/dev/dri --device=/dev/mxcd --privileged=true --group-add video --name <container_name> -v /nfs:/nfs --security-opt seccomp=unconfined --security-opt apparmor=unconfined --shm-size 100gb --ulimit memlock=-1 <image_id> bash
实例化成功后,进入容器
docker exec -it container_name /bin/bash
3.3.4 创建虚拟环境
修改项目安装文件,启动文件/workspace/setup.sh,调整如下
# conda create -n r1-v python=3.11
# conda activate r1-v

# Install the packages in open-r1-multimodal .
cd src/open-r1-multimodal # We edit the grpo.py and grpo_trainer.py in open-r1 repo.
pip install -e ".[dev]"

# Addtional modules
pip install wandb==0.18.3
pip install tensorboardx
pip install qwen_vl_utils torchvision
# pip install flash-attn --no-build-isolation

# pip install git+https://github.com/huggingface/transformers.git # correct deepspeed support
open-r1-multimodal安装文件路径为/workspace/src/open-r1-multimodal/setup.py,调整如下
...
 extras = {}
 extras["tests"] = deps_list("pytest", "parameterized")
 # extras["torch"] = deps_list("torch")
 extras["quality"] = deps_list("black", "isort", "flake8")
 extras["eval"] = deps_list("lighteval", "math-verify")
 extras["dev"] = extras["quality"] + extras["tests"] + extras["eval"]

 # core dependencies shared across the whole project - keep this to a bare minimum :)
 install_requires = [
     deps["accelerate"],
     deps["bitsandbytes"],
     deps["einops"],
     deps["datasets"],
     # deps["deepspeed"],
     deps["hf_transfer"],
     deps["huggingface-hub"],
     deps["liger_kernel"],
     deps["packaging"],  # utilities from PyPA to e.g., compare versions
     deps["safetensors"],
     deps["sentencepiece"],
     deps["transformers"],
     deps["trl"],
 ]
 ...
以上操作的原因是平台硬件需要使用适配的计算库才能正常运行。
3.3.5 环境确认与库调整
在环境安装过程中,由于会有库的依赖情况,所以会出现一些特殊适配库会被重新安装,从而影响硬件正常使用,因此需要对库版本进行确认,待确认库名如下:
- torch
- torchvision
- torchaudio
- triton
- rotary_emb
- mcspconv
- fused_dense_lib
- flashinfer
- flash_attn
- dropout_layer_norm
- apex
- bitsandbytes
通过以下命令查看库版本:
conda activate r1-v
pip list
如果以上库在安装后,版本号中没有’+metax****‘等字样,说明该库在安装中已经发生变化,需要重新安装,将3.2中提到的库文件进行安装即可,安装命令如下:
pip install xxxxx.whl
4. 项目运行
4.1 数据、模型下载
数据的组成包括:图片+问题+答案,具体组织格式可以参看项目使用的训练集。本项目也提供了部分开源数据使用,具体下载和放置如下。
训练数据准备:
mkdir ./data

# 下载GRPO训练数据
https://huggingface.co/datasets/leonardPKU/clevr_cogen_a_train
# 完成下载后将后续创建的run.sh中dataset_name参数设置为该数据集路径
评价数据准备:
cd ./src/eval
wget https://www.cs.jhu.edu/~zhuowan/zhuowan/SuperCLEVR/to_be_released/images.zip

unzip images.zip
这里使用Qwen2-VL作为预训练模型,模型下载地址:
https://huggingface.co/Qwen/Qwen2-VL-2B-Instruct/tree/main
# 完成下载后将后续创建的run.sh中model_name_or_path参数设置为该模型路径
*huggingface模型、数据国内下载高速方法参看(HF-Mirror),按照首页底部下方法操作。
4.2 准备训练脚本
在项目目录下创建运行脚本run.sh,具体内容可以参看项目readme.md,如果训练出现OOM(显存不足),就使用deepspeed模式,配置如下:
cd src/open-r1-multimodal

export DEBUG_MODE="true" # Enable Debug if you want to see the rollout of model during RL
export LOG_PATH="./debug_log_2b.txt"

torchrun --nproc_per_node="8" \
     --nnodes="1" \
     --node_rank="0" \
     --master_addr="127.0.0.1" \
     --master_port="12345" \
     src/open_r1/grpo.py \
     --deepspeed local_scripts/zero3.json \
     --output_dir <OUTPUT_DIR> \
     --model_name_or_path <PATH-TO-Qwen2-VL-2B-Instruct> \
     --dataset_name leonardPKU/clevr_cogen_a_train \
     --deepspeed local_scripts/zero3.json \
     --max_prompt_length 512 \
     --max_completion_length 512 \
     --per_device_train_batch_size 1 \
     --gradient_accumulation_steps 2 \
     --logging_steps 1 \
     --bf16 \
     --report_to wandb \
     --gradient_checkpointing false \
     --attn_implementation flash_attention_2 \
     --max_pixels 401408 \
     --num_train_epochs 2 \
     --run_name Qwen2-VL-2B-GRPO-CLEVR-70k \
     --save_steps 100 \
     --save_only_model true \
     --num_generations 8   # number of outputs G in grpo, reduce it would lead to faster training and smaller memory cost but higher variance
4.3 模型训练
按照以下命令即可开始任务训练:
bash run.sh
在启动中会出现wenbd的log选项,如果需要将训练过程的曲线可视化出来需要填入wandb的信息,按照此网站(模型训练过程可视化–WandB的使用方法-CSDN博客)说明进行wandb login配置即可。
4.4 模型评价
按照项目readme.md进行数据准备,然后按照以下操作调整评价代码:
...
MODEL_PATH="<OUTPUT_DIR>/checkpoint-100"
OUTPUT_PATH="<OUTPUT_LOG>"
...
以上MODEL_PATH为训练时设定的各step保存点保存的模型路径,OUTPUT_PATH为输出测试推理记录的地址,该文件中包括评价结果和测试推理结果等。
*其它模型的训练与评价均与上类似,参看项目readme.md文件进行调整即可。
5. 一键式启动安装
5.1 镜像加载
使用我们提供的镜像r1-v.tar(项目代码更新与2025/2/11)文件,导入镜像:
docker load -i r1-v.tar
5.2 镜像实例化
其中路径映射(-v)设置根据需要设置:
docker run -itd --net=host --uts=host --ipc=host --device=/dev/dri --device=/dev/mxcd --privileged=true --group-add video --name r1_v -v /mnt:/mnt --security-opt seccomp=unconfined --security-opt apparmor=unconfined --shm-size 100gb --ulimit memlock=-1 r1-v:v2.0 bash
5.3 进入docker:
docker exec -it r1_v /bin/bash
5.4 进入项目:
cd /home/sw/R1-V
5.5 修改训练脚本
修改训练脚本(run_train.sh)模型、数据集路径:
export DEBUG_MODE="true" # Enable Debug if you want to see the rollout of model during RL
export LOG_PATH="./debug_log_2b.txt"

cd src/open-r1-multimodal

torchrun --nproc_per_node="8" \
     --nnodes="1" \
     --node_rank="0" \
     --master_addr="127.0.0.1" \
     --master_port="12345" \
     src/open_r1/grpo.py \
     --deepspeed local_scripts/zero3.json \
     --output_dir <OUTPUT_DIR> \  # 指定模型保存路径
     --model_name_or_path <PATH-TO-Qwen2-VL-2B-Instruct> \ # 指定基础模型路径
     --dataset_name <PATH-TO-DATASET-In-Repo> \  # 指定数据集路径
     --max_prompt_length 1024 \
     --per_device_train_batch_size 1 \
     --gradient_accumulation_steps 2 \
     --logging_steps 1 \
     --bf16 \
     --report_to wandb \
     --gradient_checkpointing false \
     --attn_implementation flash_attention_2 \
     --max_pixels 401408 \
     --num_train_epochs 2 \
     --run_name Qwen2-VL-2B-GRPO-CLEVR-70k \
     --save_steps 100 \
     --save_only_model true \
     --num_generations 8
*如果不想用wandb,–report_to 设置为none即可。
5.6 训练启动
完成上述准备,启动训练:
bash run_train.sh
5.7 评价启动
按照项目readme.md准备好数据,修改评价脚本的模型路径和log保存路径,执行评价脚本:
cd src/eval
python test_qwen2vl_counting_superclevr.py
*适配docker软件版本的必要部分安装包都放置在docker中/home/sw/maca_wheel,需更新环境时可能会用上。
5.8 评价结果
在SuperCLEVR数据集上评价结果:
| 平台 | base | 50steps | 100steps |
|---|---|---|---|
| C500 | 45.5 | 78.5 | 77 |
*训练时性能是60s/its
*相关任务镜像放置于VDI (10.2.179.28:/mnt/nvme0n1p1/R1_images_release)m